Bacon Jam Cheeseburger Sliders: Perfect Party Appetizer
Our Ultimate Bacon Jam Cheeseburger Sliders: The Perfect Party Food
Are you on the hunt for a showstopping dish that will have every guest at your next get-together begging for the recipe? Perhaps something a bit more special than standard party nibbles, but without the fuss of creating individual portions? We completely understand. You want to present something truly delicious that doesn’t chain you to the kitchen. Well, your search is over, because we have the answer right here: our sensational Bacon Jam Cheeseburger Sliders.
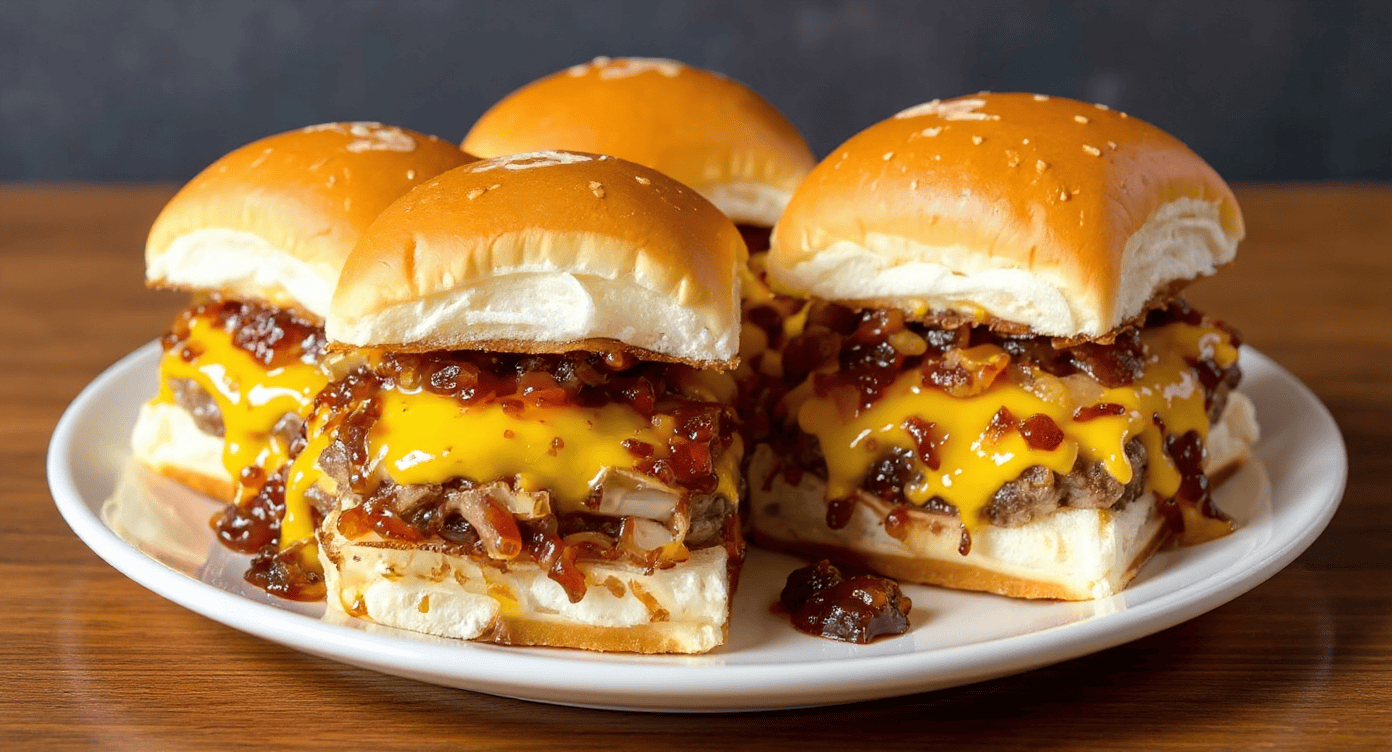
These are far more than just miniature burgers. We’re talking about perfectly seasoned, juicy beef patties, nestled under a layer of gooey melted cheese, and crowned with a generous spoonful of our glorious, sweet and smoky homemade bacon jam. All this goodness is housed within soft, fluffy brioche buns, which are brushed with garlic butter and baked to a perfect golden brown. They are, quite simply, a flawless bite.
Why You’ll Absolutely Adore This Bacon Jam Cheeseburger Sliders Recipe
We’re quite sure this will become your new favourite recipe for every kind of event, from a casual family movie night to a lively birthday bash. Here is precisely why we’re so fond of them:
- A Symphony of Flavours: The blend of the sweet-and-salty bacon jam, the savoury beef patty, the tangy melted cheddar, and the rich garlic butter topping is absolutely divine. Every single bite delivers a wonderfully balanced taste experience.
- Made for Sharing: Sliders are the quintessential social food. Their grab-and-go nature makes them perfect for parties, picnics, or game-day feasts. No need for plates or cutlery!
- Deceptively Easy to Make: Although they have a gourmet appearance and taste, these homemade sliders are remarkably simple to put together. We employ a clever method of baking the beef as a single large patty, which is a fantastic time-saver.
- A Guaranteed Crowd-Pleaser: We have never met anyone who isn’t immediately smitten with these sliders. They’re a certified hit with both kids and grown-ups, destined to be the highlight of any food spread. This is what makes them such easy party food.
Ingredients for Success
To help you assemble these little marvels, we have organised the ingredients into their three main parts: the bacon jam, the sliders themselves, and the essential garlic butter topping.
For the Sweet & Savoury Bacon Jam
- 250g streaky bacon, chopped
- 1 large red onion, finely chopped
- 2 cloves garlic, minced
- 75g soft brown sugar
- 60ml maple syrup
- 60ml apple cider vinegar
- 30ml strong black coffee (or water)
- 1/2 tsp smoked paprika
- A pinch of black pepper
For the Juicy Beef Sliders
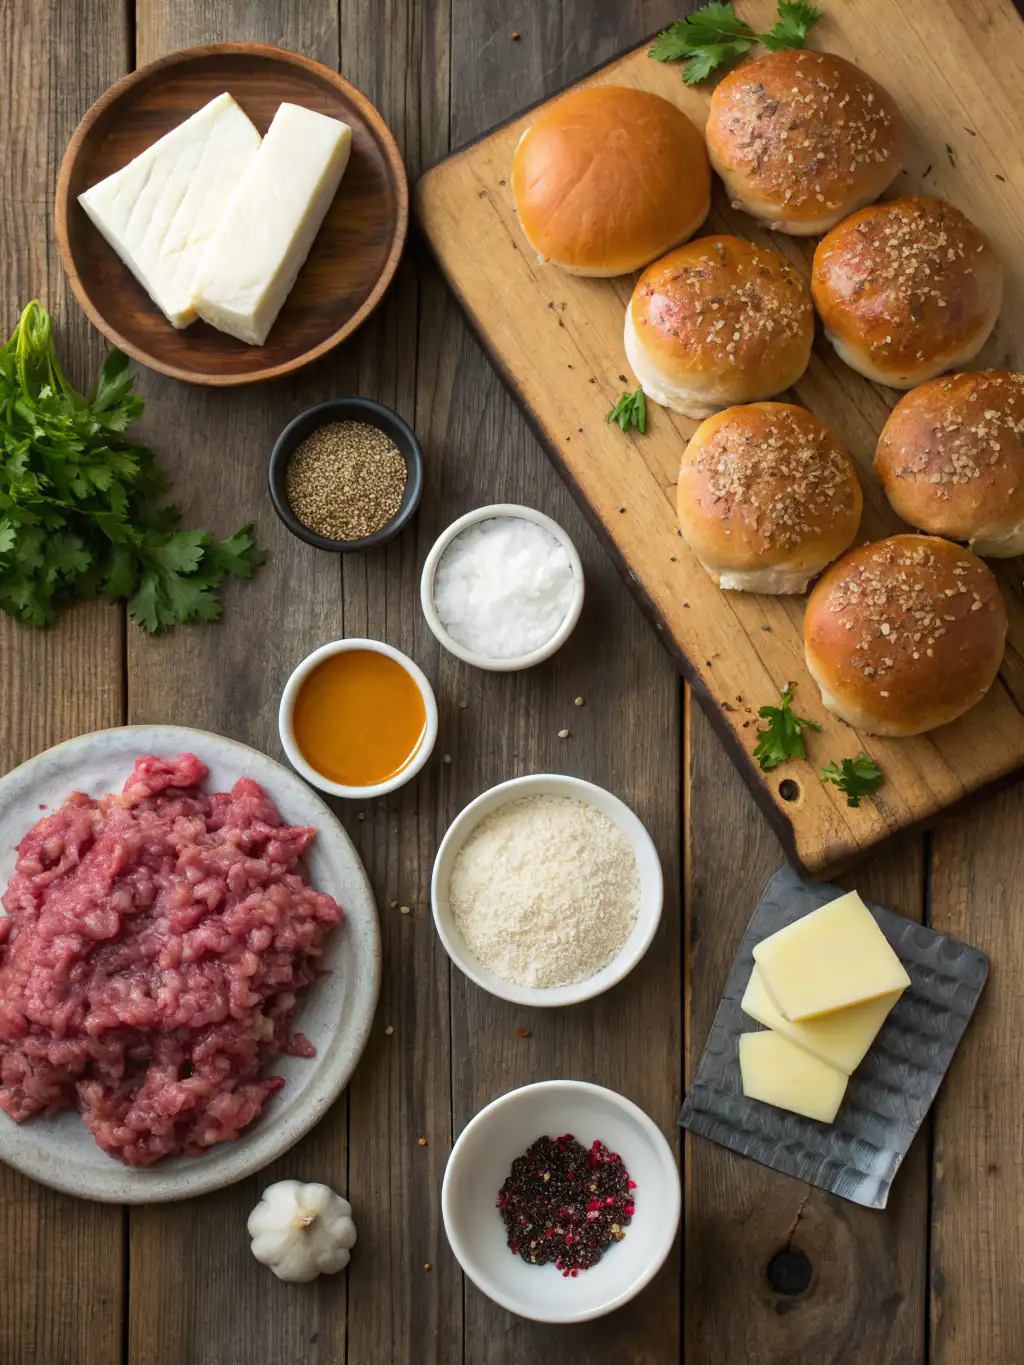
- 500g lean beef mince (80/20 fat ratio is ideal)
- 1 tsp onion powder
- 1 tsp garlic powder
- 1/2 tsp salt
- 1/2 tsp black pepper
- 12 slider buns (brioche works wonderfully)
- 8-10 slices of mature cheddar or American-style cheese
For the Garlic Butter Topping
- 60g unsalted butter, melted
- 1 tsp garlic powder
- 1 tbsp fresh parsley, finely chopped (optional)
- 1 tbsp sesame seeds (optional)
Step-by-Step Guide to Making the Perfect Cheeseburger Sliders
Let’s approach this in two straightforward stages. First, we’ll create the incredible bacon jam, which you can conveniently prepare a few days ahead. After that, we’ll assemble and bake the sliders until they’re absolutely perfect.
Part 1: Crafting the Irresistible Bacon Jam
This is where the real alchemy happens. An excellent bacon jam recipe depends on slow cooking to develop its deep, rich flavours. The technique of gently cooking the onions and sugar is a type of caramelisation, a process you can read more about from the culinary team at BBC Good Food.
- Crisp the Bacon: In a medium pan over a medium heat, fry the chopped bacon until it becomes wonderfully crisp. Use a slotted spoon to transfer the bacon to a plate lined with kitchen paper, leaving approximately one tablespoon of the rendered bacon fat in the pan.
- Sauté the Aromatics: Tip the finely chopped red onion into the pan with the reserved bacon fat. Cook gently for 10–15 minutes, stirring now and then, until the onion is completely soft, sweet, and translucent. Now, add the minced garlic and continue to cook for another minute until it becomes fragrant.
- Combine and Simmer: Return the crispy bacon pieces to the pan. Stir in the brown sugar, maple syrup, apple cider vinegar, black coffee, smoked paprika, and black pepper. Give everything a good mix to combine.
- Let it Bubble: Bring the mixture to a gentle simmer before turning the heat down to low. Allow it to bubble away for 20–25 minutes, or until the liquid reduces and transforms into a thick, glossy, and glorious jam. Set it aside for later.
Part 2: Assembling the Bacon Jam Cheeseburger Sliders
With the jam ready, it’s time to construct your cheeseburger sliders recipe. This stage is swift, simple, and wonderfully satisfying!
- Preheat and Prepare: Start by preheating your oven to 180°C (160°C Fan / Gas Mark 4). Then, lightly grease a 9×13-inch baking dish.
- Season the Mince: In a large mixing bowl, add the beef mince, onion powder, garlic powder, salt, and pepper. Use your hands to gently combine the ingredients, taking care not to overmix, as this can result in tough meat.
- Form the Patty: Gently press the seasoned mince mixture into the bottom of your greased baking dish, creating one large, even patty that covers the base.
- First Bake: Place the dish in the preheated oven and bake for 15–20 minutes, until the beef is cooked all the way through. Carefully pour away any excess fat that has collected in the dish.
- Prepare the Buns: While the beef cooks, get the slider buns ready. Keeping the buns connected, slice the entire slab of 12 horizontally through the middle. Place the bottom section of the buns into a separate baking dish or onto a baking sheet.
- Assemble the Sliders: When the beef is cooked, carefully lift the entire patty and place it on top of the bottom half of the buns. Arrange the cheese slices in an even layer over the hot beef so they start to melt. Spoon your luscious homemade bacon jam generously over the cheese. Finish by placing the top half of the buns over the jam.
- Add the Topping: In a small bowl, whisk the melted butter with the garlic powder and chopped parsley (if using). Generously brush this fragrant butter mixture all over the tops of the buns. For that classic burger finish, sprinkle over some sesame seeds.
- Final Bake: Bake for an additional 10–15 minutes. The sliders are ready when the cheese is fully melted and bubbling, and the buns are a beautiful golden brown. Allow them to sit for a few minutes before cutting into individual mini burgers and serving hot.
Top Tips for Flawless Homemade Sliders
- Don’t Overwork the Meat: When you mix the seasonings into the beef mince, a light touch is key. Overworking the meat can make the patties dense and chewy.
- Choose Your Cheese Wisely: We find that a strong mature cheddar offers a brilliant tangy flavour, while American-style cheese delivers that classic, irresistible melt. Provolone or Swiss cheese would also be delightful choices!
- Rest Before Slicing: Letting the sliders rest for just a couple of minutes after baking allows the juices in the meat to settle, which guarantees a moist and flavourful bite every time.
- Bun Quality Matters: Soft and slightly sweet brioche buns are the ideal partner for these rich sliders. That said, any soft dinner rolls will do the job nicely if needed.
What to Serve with Your Sliders
These beef sliders are a brilliant focal point for any casual dining experience. To transform them into a complete meal, we recommend serving them with classic accompaniments such as skinny fries, chunky onion rings, or a fresh and creamy coleslaw. For a larger party spread, consider adding some other popular appetisers. We think these sliders go particularly well with some crispy Homemade Mozzarella Sticks for a truly decadent feast. And for dessert? Something simple yet delicious like a tray of rich, gooey Raspberry Brownies is the perfect way to finish.
Storage, Reheating, and Make-Ahead Magic
Storing Leftovers
In the unlikely event that you have any sliders left over, you can store them in an airtight container in the fridge for up to three days.
The Best Way to Reheat
To get the best results, we suggest reheating your sliders in the oven. Arrange them on a baking tray and cover them loosely with foil to stop the buns from browning too much. Bake at 160°C for around 10–15 minutes, or until they are heated through. We tend to avoid the microwave, as it can make the buns a little soggy.
Make-Ahead Instructions
You can certainly prepare parts of this appetizer recipe in advance! The bacon jam is ideal for making ahead; it can be stored in a sealed jar in the fridge for up to a week. You could also cook the beef patty ahead of time. When it’s time to eat, just assemble the sliders with the cheese, jam, and buns, and pop them in the oven as instructed.
Frequently Asked Questions (FAQ)
Can I make the bacon jam ahead of time?
Yes, most definitely! The bacon jam is the ideal make-ahead element of this recipe. It keeps beautifully in an airtight container in the refrigerator for at least a week. In fact, we find the flavours deepen and improve after a day or two!
Can I use turkey mince instead of beef?
Of course you can. If you’d rather not use beef, feel free to substitute it with turkey or even chicken mince. Do bear in mind that these are leaner options, so you may need to reduce the cooking time slightly to prevent them from becoming dry.
Are these sliders freezable?
Yes, they freeze very well. Our advice is to freeze them fully assembled but before you do the final bake. Wrap the entire dish securely in a double layer of cling film, followed by a layer of foil. They can be stored in the freezer for up to three months. To cook, simply bake them from frozen, adding an extra 20–25 minutes to the final baking time and keeping them covered with foil for the first half of the cook.
What’s the best cheese to use for these beef sliders?
That really is a matter of personal taste! For that classic, gooey cheeseburger pull, American-style cheese slices are hard to beat. If you prefer a more pronounced, sharp flavour, a good quality mature cheddar is an excellent choice. Provolone, Monterey Jack, or even a spicy pepper jack cheese would also be fantastic alternatives.
Conclusion: Time to Get Cooking!
So there you have it—our ultimate guide to creating Bacon Jam Cheeseburger Sliders that are sure to be the star of any occasion. They offer the perfect harmony of sweet, savoury, cheesy, and meaty flavours, all neatly presented in a convenient, shareable format. This recipe proves that you don’t need professional skills to produce truly spectacular food.
The next time you’re organising a party, a special family meal, or simply craving an indulgent treat, we highly recommend you give this recipe a try. We are confident you will be delighted with the results!
Have you made our Bacon Jam Cheeseburger Sliders? We’d love to hear your thoughts in the comments section below. And please don’t forget to share this recipe with your fellow food lovers!