The Ultimate Biscoff Rice Krispie Treats: A No-Bake Sensation
Are you on the hunt for a dessert that blends a treasured childhood memory with a dash of contemporary elegance? A treat that is wonderfully simple to prepare but offers an incredible depth of flavour that will have everyone clamouring for the recipe? If that sounds tempting, then you have certainly landed in the right spot. We are about to elevate the classic, gooey Rice Krispie treat into something truly special using the delectable, caramelised spice of Lotus Biscoff.
We hold the firm belief that the finest recipes are often the most straightforward, and these Biscoff Rice Krispie Treats are a perfect illustration of this idea. They are delightfully chewy, rich with butter, and brimming with the distinctive speculoos biscuit taste that has captivated food enthusiasts across the globe. This isn’t merely a recipe; it’s a chance to craft a moment of simple, unadulterated pleasure. Leave complicated baking endeavours for another day—this effortless, no-bake dessert can be made in mere minutes and is ideal for parties, charity bake sales, or as a lovely afternoon indulgence. Let’s get started and make a little bit of magic together.
Why You’ll Love This Biscoff Rice Krispie Treats Recipe
Before we dive into the method, let us explore precisely why this recipe is destined to become your new favourite sweet creation. We have meticulously tested and refined this formula to guarantee it is not just good, but utterly flawless on every occasion. Here is what makes it stand out:
- Incredibly Easy to Make: With just a few simple ingredients and no need for an oven, this is a fantastic recipe for cooks of any ability. If you can melt butter with marshmallows, you possess all the skills required to make these treats.
- A Flavour Explosion: The profound, caramelised notes and gentle spice from the Biscoff spread and biscuits introduce a remarkable complexity that you just don’t find in standard Rice Krispie treats.
- Perfectly Chewy Texture: We are going to share our secrets to achieving that ideal soft and chewy consistency that won’t become unpleasantly hard once set. Say goodbye to overly tough treats for good!
- Completely Customisable: While magnificent just as they are, these treats provide a brilliant canvas for other enhancements like a white chocolate topping, a sprinkle of sea salt, or even more Biscoff biscuits. We will delve into some exciting variations later on.
Ingredients for Your Biscoff Rice Krispie Treats
Assembling your components is the first move towards gooey, delicious success. We have discovered that using high-quality ingredients makes a real difference to the final result, particularly when a recipe is as simple as this one. Here is the list of what you will require:
- Butter: We opt for unsalted butter to have full control over the salt levels, but the salted variety will suffice if it’s all you have. You will need 90g (6 tablespoons).
- Mini Marshmallows: These are our preference as they melt faster and more uniformly than larger ones. You will need a 280g (10-ounce) bag, plus an additional cup (around 50g) to be stirred in later for texture.
- Smooth Biscoff Spread: This is the undeniable hero of our recipe! The smooth version incorporates beautifully into the melted marshmallow base. You will require 200g (roughly ¾ cup).
- Rice Krispies Cereal: The quintessential crispy base. You will need 180g (approximately 6 cups) of the cereal.
- Lotus Biscoff Biscuits: We crush these and fold them through the mixture for an additional layer of flavour and a wonderful crunchy texture. You will need about 125g (around 16 biscuits), crushed.
- Vanilla Extract: One teaspoon of good-quality vanilla extract helps to round out and heighten all the other flavours.
- A Pinch of Salt: A tiny pinch of sea salt expertly balances the sweetness and makes the Biscoff notes sing.
Step-by-Step Instructions: Creating the Perfect Biscoff Squares
Are you ready to create the most delectable Biscoff Rice Krispie Treats imaginable? Just follow our straightforward guide. We suggest giving all the steps a quick read-through before you start.
- Prepare Your Tin: To begin, get a 9×9 inch (23×23 cm) square baking tin ready. To ensure nothing sticks, we advise lining it with baking parchment, allowing a slight overhang on two opposite sides to serve as ‘handles’ for easy lifting later on. Lightly grease the parchment and any exposed areas of the tin with butter or a neutral cooking spray.
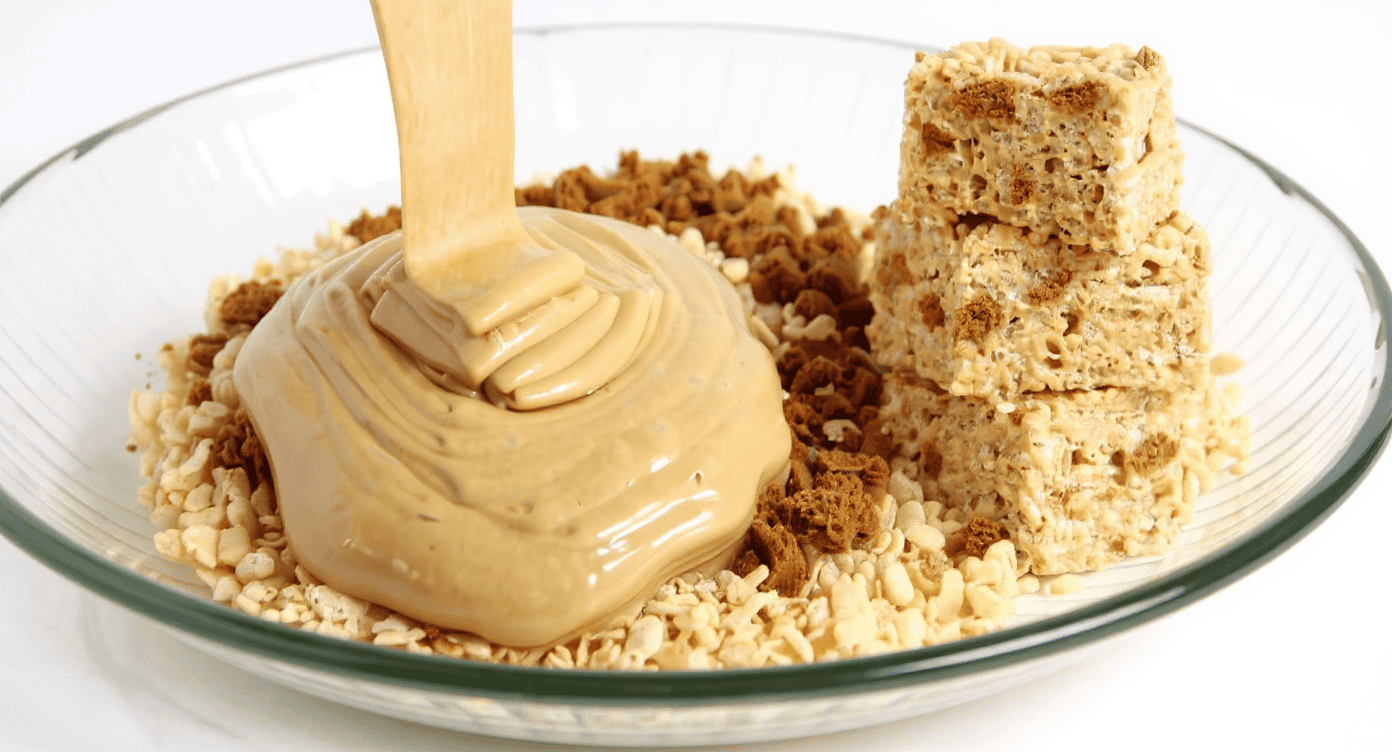
- Melt the Base: In a large, heavy-based saucepan or Dutch oven, gently melt the 90g of unsalted butter over a low heat. It is vital to keep the heat low to stop the butter from browning.
- Add Marshmallows and Biscoff: As soon as the butter has completely melted, add the 280g bag of mini marshmallows along with the 200g of smooth Biscoff spread. Stir constantly with a silicone spatula until the mixture is velvety smooth and fully combined. Remain patient and maintain a low heat to prevent the mixture from catching.
- Incorporate Flavour Boosters: Take the saucepan off the heat. Promptly stir in the vanilla extract and the pinch of sea salt. This may seem like a minor addition, but it has a significant impact on the overall taste.
- Combine with Crispies and Biscuits: Now for the main assembly. Tip the Rice Krispies cereal and the crushed Biscoff biscuits into the saucepan with the marshmallow base. Using your greased spatula, gently mix everything together until the cereal and biscuit crumbs are evenly coated. You’ll want to work swiftly at this stage, as the mixture will begin to firm up.
- Add More Marshmallows (The Secret Step!): Here is our special tip for achieving an exceptionally gooey texture. Add the reserved cup of mini marshmallows and fold them through with just one or two stirs. These marshmallows will not dissolve completely, which creates delightful pockets of softness in the finished treats. This is the key to making them truly remarkable Lotus Biscoff treats.
- Press into the Tin: Carefully transfer the mixture into your prepared baking tin. With your greased spatula or a separate piece of baking parchment, gently press the mixture down into an even layer. Be careful not to compress it too firmly, as this can result in dense, hard treats.
- Let It Set: Leave the treats to set at room temperature for a minimum of one hour before you attempt to slice them. We understand the temptation to tuck in immediately, but this resting period is crucial for them to firm up enough for clean, neat cuts.
Top Tips for Chewy, Gooey Perfection
Although making Rice Krispie treats appears simple, a few clever details can elevate them from good to truly exceptional. We have picked up these lessons along the way so that you can get them right first time!
Don’t Overheat the Marshmallows
The primary cause of hard, brittle treats is overheated marshmallows. When marshmallows are cooked at too high a temperature or for too long, their sugar content crystallises, making them hard as they cool. We insist on using a very low heat and removing the saucepan from the hob as soon as the marshmallows have *just* dissolved. For a more detailed look at the science behind this, you can read this fantastic guide on making perfect marshmallow treats.
Press Gently, Not Firmly
When you move the mixture into the tin, fight the temptation to pack it down with force. Compressing the mixture removes all the air pockets, which leads to tough, dense squares. All that is needed is a light, even pressure to form a uniform layer.
The Importance of Fresh Ingredients
This point cannot be overstated. Using a bag of marshmallows that has been sitting open in your pantry for several weeks can lead to treats that are drier and less gooey. For the absolute best texture and taste, always start with a fresh, soft bag of marshmallows and a new box of crispy cereal.
A Touch of Vanilla and Salt
Please do not omit these two ingredients! They may seem insignificant, but they contribute hugely to the final product. The salt effectively cuts through the sweetness of the Biscoff and marshmallows, while the vanilla introduces a lovely, fragrant warmth that beautifully enhances the spiced biscuit notes.
Recipe Variations and Fun Add-ins
A wonderful aspect of this easy Biscoff recipe is its incredible versatility. Below are a few of our preferred methods for personalising your treats:
- White Chocolate Drizzle: After the treats have fully set, melt some good-quality white chocolate and drizzle it liberally across the top. The creamy sweetness of white chocolate is a heavenly pairing for the spiced Biscoff.
- Extra Biscoff Topping: For the most intense Biscoff hit, gently warm a couple of tablespoons of Biscoff spread in the microwave until it reaches a pourable consistency, then drizzle it over the top with an extra sprinkling of crushed biscuits.
- Add a Chocolate Layer: Melt a bar of your favourite milk or dark chocolate and spread it evenly over the base of your lined tin before you press the Rice Krispie mixture on top. Once it has set, you will be rewarded with a delicious chocolate-based treat.
- Mix-in Mania: Why not try folding in a cup of mini chocolate chips or even butterscotch pieces to introduce another layer of flavour?
If you enjoy experimenting with flavours in your sweet creations, we believe you will also fall in love with our recipe for Cinnamon Roll Blondies, which boasts a similarly warm and comforting spiced profile.
How to Store Your Biscoff Treats
On the off chance you have any leftovers (which is never a guarantee!), storing them correctly is essential for maintaining their fresh, chewy texture. We suggest slicing the slab into squares and keeping them in an airtight container at room temperature. They will remain in perfect condition for up to three days. You can place a small sheet of baking parchment between layers to stop them from sticking. We do not advise putting them in the fridge, as this can cause them to become hard and lose their moisture.
Because this is a no-bake Biscoff dessert, it is an excellent choice for making ahead of an event. If you are searching for other superb no-bake inspirations, our No Bake Orange Creamsicle Cheesecake is another crowd-pleasing dessert that doesn’t require any time in the oven.
Frequently Asked Questions (FAQ)
Can I use crunchy Biscoff spread?
Of course! Using the crunchy version of Biscoff spread will introduce an additional textural element from the fine biscuit pieces it contains. It makes a wonderful substitute if you prefer a little more crunch in your treats.
Are these Biscoff Rice Krispie Treats gluten-free?
Regrettably, this recipe is not gluten-free as it is written. Both Lotus Biscoff products (the spread and biscuits) contain wheat flour, while most Rice Krispies cereals include malt extract, which comes from barley. To adapt this recipe, you would need to source a certified gluten-free crisped rice cereal, as well as a gluten-free alternative to speculoos biscuits and spread.
How long do these treats last?
When kept in an airtight container at room temperature, your Biscoff Rice Krispie Treats will stay delightfully fresh and chewy for up to 3 days. Beyond this point, they may start to harden and taste a little stale.
Can I freeze my Biscoff marshmallow treats?
Yes, they freeze exceptionally well! For the best results, we recommend cutting them into individual portions, wrapping each square tightly in cling film, and then placing them all into a freezer-safe bag or container. They can be stored in the freezer for up to 6 weeks. When you are ready to enjoy one, simply take it out and allow it to thaw at room temperature for 15-20 minutes.
Conclusion: Your New Favourite No-Bake Treat
And there we have it—a simple, clear guide to crafting the most flavourful, chewy, and utterly delicious Biscoff Rice Krispie Treats. By merging the nostalgic joy of a classic Rice Krispie square with the uniquely wonderful taste of Biscoff, we have developed a truly unforgettable dessert that is perfectly suited for any occasion.
We really hope you feel inspired to head into the kitchen and give this recipe a go. It is a fantastic activity to share with children and a surefire method for brightening anyone’s day. After you have whipped up a batch, we would be delighted to hear how it went! Please leave a comment below to tell us about your experience or to share any of your own inventive twists. Happy (no) baking!