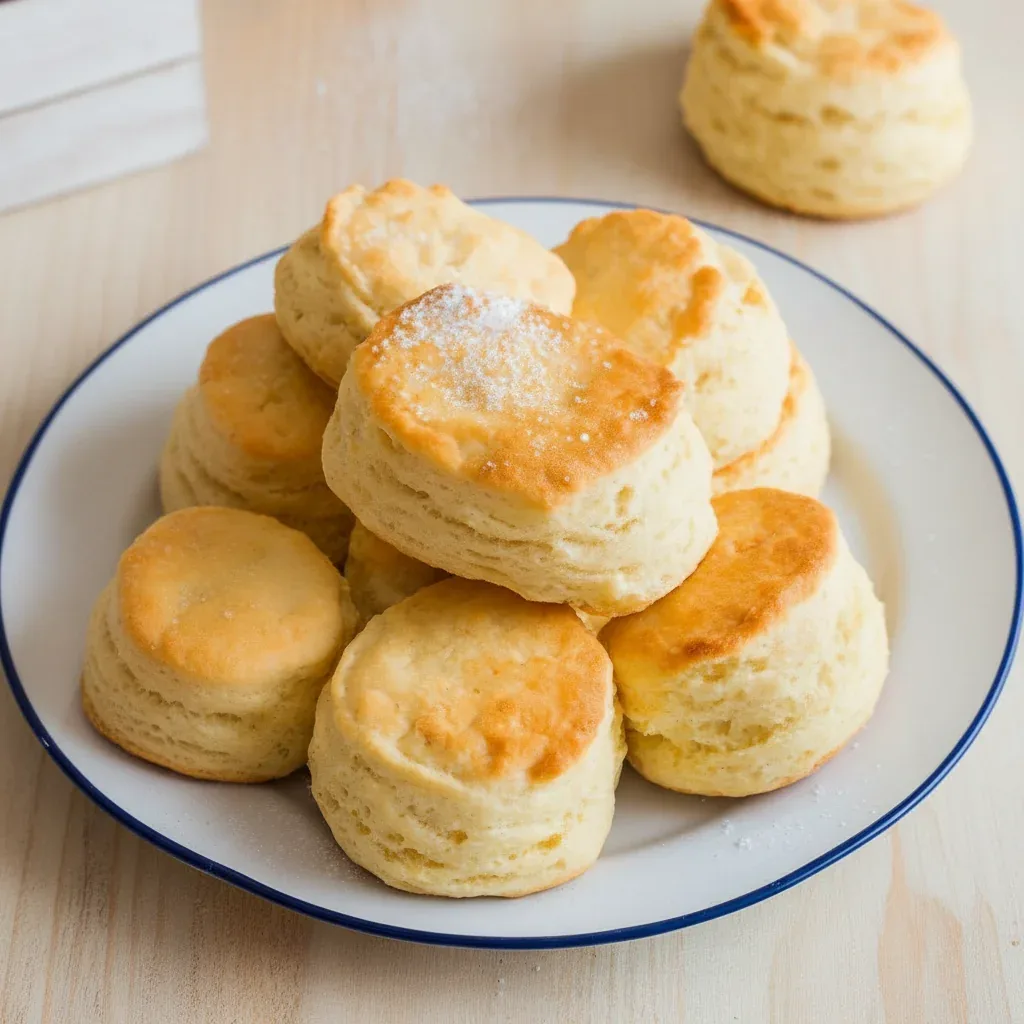
Buttermilk Biscuits: Flaky & Golden

Have you ever pictured yourself opening the oven to a tray of perfectly risen, golden-brown biscuits, their flaky layers sending steam into the air, ready for a knob of butter? That wonderfully comforting aroma filling your home is one of life’s purest joys. For many, achieving such baking perfection seems like a well-guarded family secret. We’re here to let you in on the truth: it isn’t a secret at all. With the correct technique and a bit of care, you can master the art of making flawless Buttermilk Biscuits. This recipe is your complete guide to creating the most tender, flavourful, and impressively layered biscuits you’ve ever tasted, all from the comfort of your own kitchen.
What Makes These Buttermilk Biscuits So Special?
What elevates a biscuit from a dense, crumbly bake to a magnificent, airy delight? The distinction lies in a few crucial principles that we have refined in this recipe. The magic is in the details: the temperature of your ingredients, the gentle touch you use with the dough, and the tangy, tenderising quality of buttermilk. Unlike many other recipes that can seem overly complex, our method prioritises simplicity and technique to yield consistently brilliant results.
Our true secret weapon is ice-cold butter. By ensuring our butter (and buttermilk!) remains as chilled as possible, we prevent it from melting into the flour. Instead, it stays in small, distinct pieces throughout the dough. As these biscuits bake in the hot oven, the water within the butter evaporates into steam, pushing the layers of dough upwards and creating those desirable air pockets. This process is what guarantees you incredibly light and flaky biscuits time after time. When you combine this with the acidic tang of buttermilk, which reacts with the raising agents for a superior lift and a uniquely soft crumb, you have the formula for breakfast perfection.
Why You’ll Love This Recipe
- Incredibly Flaky Layers: Our specific folding technique, known as lamination, builds dozens of buttery, pull-apart layers that are truly irresistible.
- Ready in Under 30 Minutes: From gathering your ingredients to pulling a fresh batch from the oven, this recipe is remarkably swift, making it ideal for a weekend breakfast or as a side for a weeknight meal.
- Simple, Everyday Ingredients: There’s no need for any specialised equipment or hard-to-find ingredients. Everything you need is probably already in your pantry and refrigerator.
- Foolproof for Beginners: We’ve broken down each stage with clear instructions and helpful tips, ensuring that even those new to baking can achieve fantastic results.
- Wonderfully Versatile: These biscuits are the perfect foundation for countless flavours. Enjoy them warm with butter and jam, smother them in savoury gravy, or use them to build delicious breakfast sandwiches.
Ingredients
- 300g (2 ½ cups) plain flour, plus extra for dusting
- 2 tbsp caster sugar
- 1 tbsp baking powder
- ½ tsp bicarbonate of soda
- 1 tsp salt
- 115g (½ cup) unsalted butter, very cold and cubed
- 240ml (1 cup) cold buttermilk
- 2 tbsp melted butter, for brushing (optional)
Step-by-Step Guide to Perfect Homemade Biscuits
Creating wonderful biscuits is more about method than complicated processes. Follow our guide closely, and you will be rewarded with a beautiful, high-rising batch. We suggest reading through all the steps before you begin.
1. Preparing Your Ingredients and Workspace
To begin, preheat your oven to 220°C (200°C Fan / Gas Mark 7). Line a baking tray with parchment paper. The absolute key to flaky biscuits is controlling the temperature. We cannot emphasise this enough: your ingredients must be cold. We suggest dicing your butter and then popping it in the freezer for 10-15 minutes before you get started. You could even do the same with your mixing bowl and flour if time permits! A cool work surface also helps keep everything chilled.
2. Combining the Dry Ingredients
In a large, chilled mixing bowl, whisk together the 300g of plain flour, 2 tbsp of caster sugar, 1 tbsp of baking powder, ½ tsp of bicarbonate of soda, and 1 tsp of salt. Whisking not only merges the ingredients but also helps to aerate them, which contributes to a lighter finished biscuit.
3. Cutting in the Butter
Next, add your frozen, cubed butter to the flour mixture. Using a pastry blender, a pair of knives, or just your fingertips, quickly work the butter into the flour. The aim is to break the butter down into pieces roughly the size of small peas. You should still see visible flecks of butter distributed through the flour. Be swift to stop the butter from warming up and melting from the heat of your hands.
4. Adding the Buttermilk
Make a well in the centre of the flour-butter mixture. Pour in the cold buttermilk all at once. Using a fork or a spatula, gently mix until the dough just starts to form a shaggy, slightly sticky mass. This is the stage where mistakes are most often made. It is crucial not to overmix! Overworking the dough develops gluten, which leads to tough biscuits rather than light and tender homemade biscuits.
5. The Secret to Flaky Layers: Lamination
Turn the rough dough out onto a lightly floured surface. Gently press it together with your hands and pat it into an approximate rectangle, about 2cm (¾ inch) thick. Now for the lamination: fold one-third of the rectangle over the middle, then fold the other third over that, like a letter. Rotate the dough by 90 degrees and pat it out into a rectangle again. Repeat this folding and turning motion 3-4 times. This straightforward action is what builds those incredible, separate layers.
6. Cutting and Baking Your Biscuits
After the last fold, pat the dough out to a thickness of around 2.5cm (1 inch). For tall, impressive biscuits, a thicker dough is vital. Using a sharp 6cm (2.5-inch) round cutter, press straight down into the dough. Do not twist the cutter, as this can seal the edges and stop the biscuits from rising properly. Arrange the cut biscuits on your prepared baking tray so they are just touching. This helps them to support each other and rise upwards. Gently gather any offcuts of dough, pat out, and cut more biscuits without re-kneading.
If desired, brush the tops with a little buttermilk or melted butter to achieve a lovely golden-brown colour. Bake for 12-15 minutes, until the biscuits are tall, puffed, and golden on top. Serve immediately while still warm.
Top Tips for the Flakiest Buttermilk Biscuits
To ensure your success every single time, we have put together a few essential tips that will elevate your biscuit-making to the next level.
- Keep Everything Cold: We have said it before, but it is the golden rule of making biscuits. Cold butter creates pockets of steam as it bakes, which forces the dough to separate into those wonderful flaky layers. The science behind this is quite interesting, and you can delve deeper with culinary experts like King Arthur Baking, who explain the process in great detail.
- Don’t Overwork the Dough: Be gentle at every stage of the process. The more you mix or knead, the more gluten you create. While gluten is perfect for chewy bread, it is the adversary of a tender biscuit. Mix only until the ingredients are just incorporated and handle the dough as little as possible.
- Use Fresh Leavening Agents: Raising agents like baking powder and bicarbonate of soda can lose their effectiveness over time. For the best possible rise, check that your leaveners are fresh. You can test baking powder by adding a teaspoon to hot water; it should fizz up immediately.
- Buttermilk is Best: Although you can create a substitute with milk and lemon juice, genuine buttermilk delivers a superior flavour and texture. Its acidity reacts with the raising agents to produce an exceptionally soft crumb and a powerful lift.
Serving Suggestions
These Buttermilk Biscuits are a delight on their own, but they also act as the perfect base for a whole host of toppings and accompaniments. They are an incredibly versatile breakfast bread.
- The Classic: Enjoy them warm from the oven, broken open and slathered with a generous amount of salted butter and your favourite jam or honey.
- Savoury Breakfast: Use them to build a hearty breakfast sandwich, filled with a fried egg, sizzling bacon, and a slice of mature cheddar cheese.
- With Gravy: Across the American South, biscuits are famously served smothered in a rich and creamy sausage gravy. It is an indulgent meal that is unbelievably satisfying.
- Dinner Companion: These biscuits are not just for breakfast. They serve as a brilliant side dish for fried chicken, robust stews, or a comforting bowl of chilli.
FAQ
Your Journey to Biscuit Perfection Starts Here
There is a unique sense of accomplishment that comes from creating a flawless batch of biscuits entirely from scratch. It is a simple craft that yields spectacular rewards, turning basic kitchen staples into a warm, comforting delight. We hope this guide has demystified the technique and empowered you to bake your own towering, tender Buttermilk Biscuits. This is one of those cornerstone baking recipes that, once you have mastered it, will bring joy to your kitchen for many years to come.
So, it’s time to roll up your sleeves, chill your butter, and prepare to bake. We promise the result is well worth the small effort. Please give this recipe a go and share how they turned out in the comments section below. We always love to see your baking creations!
Recipe Card
Ingredients
- 300g (2 ½ cups) plain flour, plus extra for dusting
- 2 tbsp caster sugar
- 1 tbsp baking powder
- ½ tsp bicarbonate of soda
- 1 tsp salt
- 115g (½ cup) unsalted butter, very cold and cubed
- 240ml (1 cup) cold buttermilk
- 2 tbsp melted butter, for brushing (optional)
Instructions
- Preheat oven to 220°C (200°C Fan / Gas Mark 7) and line a baking tray with parchment paper.
- In a large bowl, whisk together the flour, sugar, baking powder, bicarbonate of soda, and salt.
- Using a pastry blender or your fingertips, cut the very cold, cubed butter into the flour until the mixture resembles small peas.
- Pour in the cold buttermilk and mix gently with a fork until a shaggy dough just forms. Do not overmix.
- Turn the dough onto a lightly floured surface. Pat into a rectangle, fold it into thirds like a letter, rotate 90 degrees, and repeat this lamination process 3-4 times.
- Pat the dough to a final thickness of 2.5cm (1 inch). Use a 6cm (2.5-inch) round cutter to press straight down into the dough. Do not twist the cutter.
- Arrange the biscuits on the prepared tray so they are just touching. Brush the tops with melted butter (optional) and bake for 12-15 minutes, or until tall, puffed, and golden brown.
234 calories,
26g carbs,
4g protein,
12g fat