Christmas Deviled Eggs Recipe Festive Party Bite
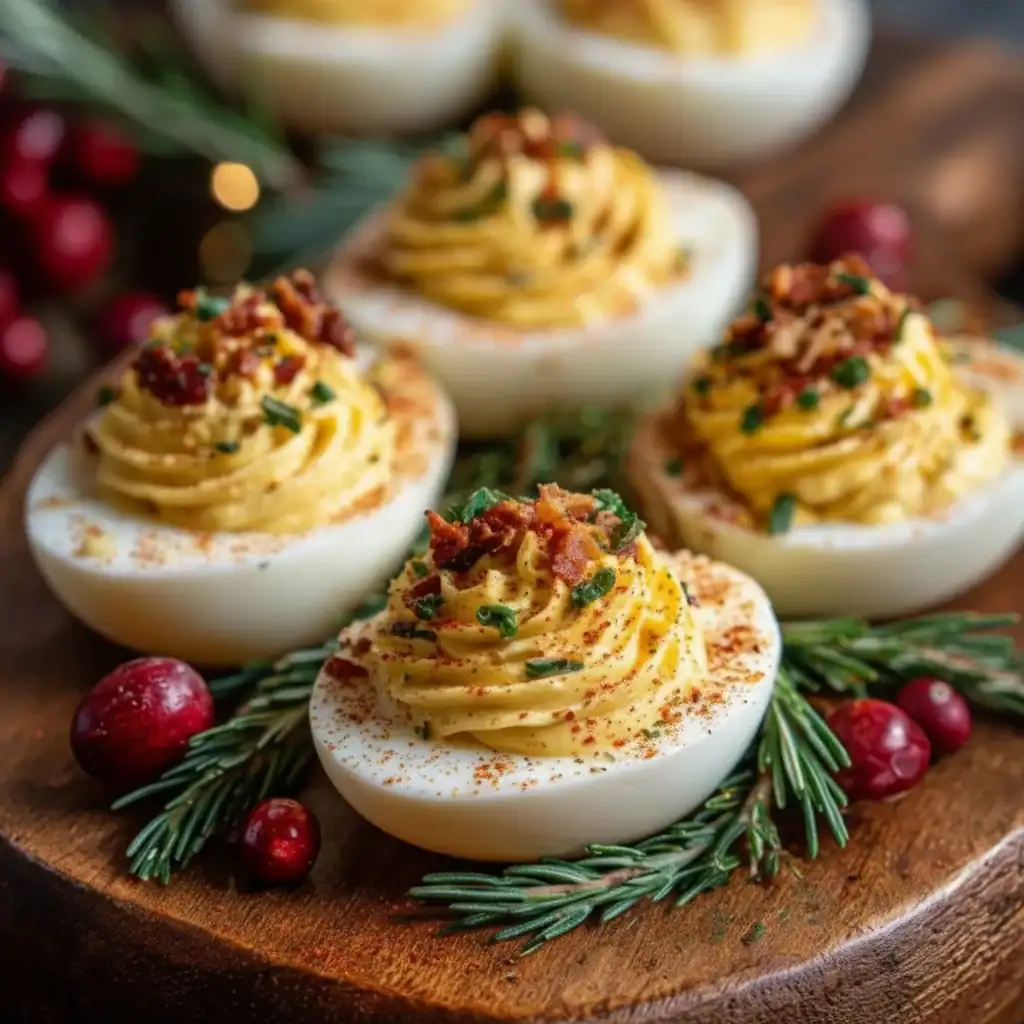
As the festive period approaches, our kitchens begin to buzz with the delightful promise of Christmas treats. Amidst the sausage rolls and cheese straws, we feel it’s high time a classic party favourite received a yuletide celebration of its own. We’re talking, of course, about the beloved deviled egg, reimagined for the most wonderful time of the year. This is our definitive Christmas Deviled Eggs Recipe, a wonderfully simple yet elegant appetizer that brings festive cheer and irresistible flavour to your holiday table. We are elevating this humble nibble into a bite-sized masterpiece, with a divinely creamy filling and a jolly splash of colour. These little morsels are astonishingly easy to prepare and are sure to vanish from the platter in a flash.
Why You’ll Love This Recipe
- Visually Stunning: With their vibrant red and green garnishes set against the creamy yellow filling, these eggs are a true feast for the eyes. They serve as a beautiful, edible centrepiece for your Christmas spread.
- Effortlessly Simple: This is the ideal stress-free recipe for the hectic holiday season, requiring minimal cooking and straightforward assembly. You can even get the components ready in advance to make hosting a breeze.
- Readily Available Ingredients: You’ll only need common, everyday staples that you probably already have in your pantry or fridge. What’s more, eggs are a brilliant source of protein, making this a naturally low-carb and gluten-free option.
- Wonderfully Customisable: While we adore this classic combination, our recipe provides a fantastic foundation for your own creativity. Feel free to add a pinch of spice or experiment with different herbs to make them uniquely yours.
Ingredients
For this delightful recipe, we find that using fresh, high-quality ingredients is the key to achieving the most exquisite flavour. The richness of the filling all comes down to the quality of your mayonnaise and, of course, the eggs themselves. Here is what you’ll need to gather.
- 12 large free-range eggs
- 150g full-fat mayonnaise (we believe a good-quality, full-fat version delivers the creamiest result)
- 2 teaspoons Dijon mustard
- 1 teaspoon white wine vinegar
- 1/4 teaspoon fine sea salt, or to taste
- 1/8 teaspoon freshly ground black pepper
- 1 tablespoon finely chopped fresh chives, plus extra for garnish
- 1 teaspoon smoked paprika, for dusting
- 1 tablespoon finely diced red bell pepper or pomegranate seeds, for garnish
Instructions
Just follow our simple, step-by-step method to craft the most perfectly creamy and festive deviled eggs. The secret lies in taking a little extra care, particularly when boiling the eggs, as this sets the stage for a perfect result.
- Boil the Eggs to Perfection: Arrange the 12 eggs in a single layer inside a large saucepan. Pour in enough cold water to cover them by at least an inch. Bring the water to a rapid, rolling boil over a high heat. The moment it’s boiling, switch off the heat completely, place a lid on the saucepan, and allow the eggs to sit in the hot water for exactly 12 minutes. This gentle cooking method ensures the yolks are perfectly set without developing a greyish tinge.
- Prepare the Ice Bath: As the eggs are cooking, fill a large bowl with iced water. When the 12 minutes have passed, use a slotted spoon to promptly move the eggs from the hot water into the ice bath. Let them cool down completely for a minimum of 15 minutes. This step is crucial as it halts the cooking process and makes the shells remarkably easy to remove.
- Peel and Slice the Eggs: Once cooled, gently tap each egg on your worktop to create cracks all over the shell. Roll the egg between your palms to help loosen the shell. We find peeling them under a gentle stream of cool water can help. After peeling, dry them with a bit of kitchen roll. Use a sharp knife to carefully slice each egg in half from top to bottom, wiping the blade between cuts for a clean, professional finish.
- Prepare the Yolk Filling: Carefully scoop the cooked yolks from the egg white halves and transfer them to a medium bowl. Arrange the now-empty egg white halves on your chosen serving dish. With a fork, mash the yolks until they form a fine, sandy texture. For an exceptionally smooth and silky filling, we highly recommend pressing the mashed yolks through a fine-mesh sieve.
- Mix the Filling Ingredients: Into the bowl with your mashed yolks, add the mayonnaise, Dijon mustard, white wine vinegar, salt, and pepper. Use a spatula to mix until the ingredients are fully incorporated and the mixture is wonderfully smooth and creamy. Finally, gently stir in the finely chopped chives.
- Fill the Egg Whites: For a polished and elegant presentation, we suggest piping the filling. Transfer the yolk mixture into a piping bag fitted with a large star nozzle (such as a Wilton 1M). Pipe a generous swirl of the filling into the hollow of each egg white half. If you don’t own a piping bag, you can achieve a lovely rustic look by using two teaspoons to neatly fill the whites.
- Garnish for a Festive Flourish: It’s time for the final festive touches. Gently dust a little smoked paprika over the top of each filled egg to add a warm colour and subtle smoky taste. Finish by sprinkling over the extra chives and the vibrant, finely diced red bell pepper or jewel-like pomegranate seeds. The combination of red and green is pure Christmas!
- Chill and Serve: For the best possible flavour, we recommend covering your deviled eggs and chilling them in the fridge for at least 30 minutes prior to serving. This gives the flavours a chance to mingle and develop. Serve them cold as the perfect beginning to your Christmas meal.
Tips for the Perfect Christmas Deviled Eggs Recipe
Over the years, we’ve prepared more deviled eggs than we can count! Along the way, we’ve gathered a few indispensable tips to guarantee they turn out brilliantly every single time.
- Older is Better for Eggs: It may seem unusual, but eggs that are a week or so old are much easier to peel than farm-fresh ones. As an egg ages, the membrane inside pulls away from the shell, creating a small air pocket that makes peeling a doddle.
– Embrace the Ice Bath: We cannot overstate the importance of this step. Plunging the hot eggs into ice water is the secret to preventing overcooking and ensuring the shells slip off with ease.
– Always Taste the Filling: Before you begin filling the whites, have a little taste of the yolk mixture. Does it need a touch more salt, or perhaps a little extra kick from the mustard? Adjust the seasoning until it’s just right for you.
– Make-Ahead and Transporting: If you’re bringing these to a festive gathering, you can transport the prepared egg whites and the filling in separate sealed containers. Simply assemble them when you arrive for a perfectly fresh presentation. A muffin tin is also a clever way to stop assembled eggs from sliding about in transit!
Festive Variations and Serving Suggestions
While we think our classic recipe is simply divine, it also serves as a brilliant blank slate for your culinary imagination. Here are a couple of our favourite variations to inspire you:
- Smoked Salmon & Dill: For an extra touch of elegance, fold a tablespoon of finely chopped smoked salmon and a teaspoon of freshly chopped dill into the yolk mixture.
- Prawn Cocktail Twist: Add a small squeeze of tomato ketchup and a dash of hot sauce to the filling. Top each egg with a small, juicy cooked prawn for a nod to the classic starter.
– Coronation Deviled Eggs: Mix 1/2 teaspoon of mild curry powder into the yolks and garnish with a tiny sprig of fresh coriander for a fragrant and flavourful alternative.
These festive deviled eggs are a fantastic standalone appetizer, but they also sit beautifully alongside other party fare. We love to serve them on a platter with some of these irresistible Bacon Brown Sugar Chicken Tenders for a delightful savoury contrast. And for something sweet afterwards, you can’t go wrong with these simple, no-bake Biscoff Truffles.
Frequently Asked Questions
And there we have it – our wonderfully simple recipe for the most charming Christmas deviled eggs. They are the perfect, fuss-free appetizer to bring a splash of festive colour and a huge amount of flavour to any holiday celebration. We’re quite sure they’ll become a cherished part of your Christmas traditions. We truly hope you and your family enjoy preparing and eating these as much as we do. If you give our recipe a go, we’d love to hear how they turned out in the comments below. Wishing you a very Happy Holidays!
Recipe Card

Ingredients
- 12 large free-range eggs
- 150g full-fat mayonnaise (we believe a good-quality, full-fat version delivers the creamiest result)
- 2 teaspoons Dijon mustard
- 1 teaspoon white wine vinegar
- 1/4 teaspoon fine sea salt, or to taste
- 1/8 teaspoon freshly ground black pepper
- 1 tablespoon finely chopped fresh chives, plus extra for garnish
- 1 teaspoon smoked paprika, for dusting
- 1 tablespoon finely diced red bell pepper or pomegranate seeds, for garnish
Instructions
- Boil the Eggs to Perfection: Arrange the 12 eggs in a single layer inside a large saucepan. Pour in enough cold water to cover them by at least an inch. Bring the water to a rapid, rolling boil over a high heat. The moment it’s boiling, switch off the heat completely, place a lid on the saucepan, and allow the eggs to sit in the hot water for exactly 12 minutes. This gentle cooking method ensures the yolks are perfectly set without developing a greyish tinge.
- Prepare the Ice Bath: As the eggs are cooking, fill a large bowl with iced water. When the 12 minutes have passed, use a slotted spoon to promptly move the eggs from the hot water into the ice bath. Let them cool down completely for a minimum of 15 minutes. This step is crucial as it halts the cooking process and makes the shells remarkably easy to remove.
- Peel and Slice the Eggs: Once cooled, gently tap each egg on your worktop to create cracks all over the shell. Roll the egg between your palms to help loosen the shell. We find peeling them under a gentle stream of cool water can help. After peeling, dry them with a bit of kitchen roll. Use a sharp knife to carefully slice each egg in half from top to bottom, wiping the blade between cuts for a clean, professional finish.
- Prepare the Yolk Filling: Carefully scoop the cooked yolks from the egg white halves and transfer them to a medium bowl. Arrange the now-empty egg white halves on your chosen serving dish. With a fork, mash the yolks until they form a fine, sandy texture. For an exceptionally smooth and silky filling, we highly recommend pressing the mashed yolks through a fine-mesh sieve.
- Mix the Filling Ingredients: Into the bowl with your mashed yolks, add the mayonnaise, Dijon mustard, white wine vinegar, salt, and pepper. Use a spatula to mix until the ingredients are fully incorporated and the mixture is wonderfully smooth and creamy. Finally, gently stir in the finely chopped chives.
- Fill the Egg Whites: For a polished and elegant presentation, we suggest piping the filling. Transfer the yolk mixture into a piping bag fitted with a large star nozzle (such as a Wilton 1M). Pipe a generous swirl of the filling into the hollow of each egg white half. If you don’t own a piping bag, you can achieve a lovely rustic look by using two teaspoons to neatly fill the whites.
- Garnish for a Festive Flourish: It’s time for the final festive touches. Gently dust a little smoked paprika over the top of each filled egg to add a warm colour and subtle smoky taste. Finish by sprinkling over the extra chives and the vibrant, finely diced red bell pepper or jewel-like pomegranate seeds. The combination of red and green is pure Christmas!
- Chill and Serve: For the best possible flavour, we recommend covering your deviled eggs and chilling them in the fridge for at least 30 minutes prior to serving. This gives the flavours a chance to mingle and develop. Serve them cold as the perfect beginning to your Christmas meal.