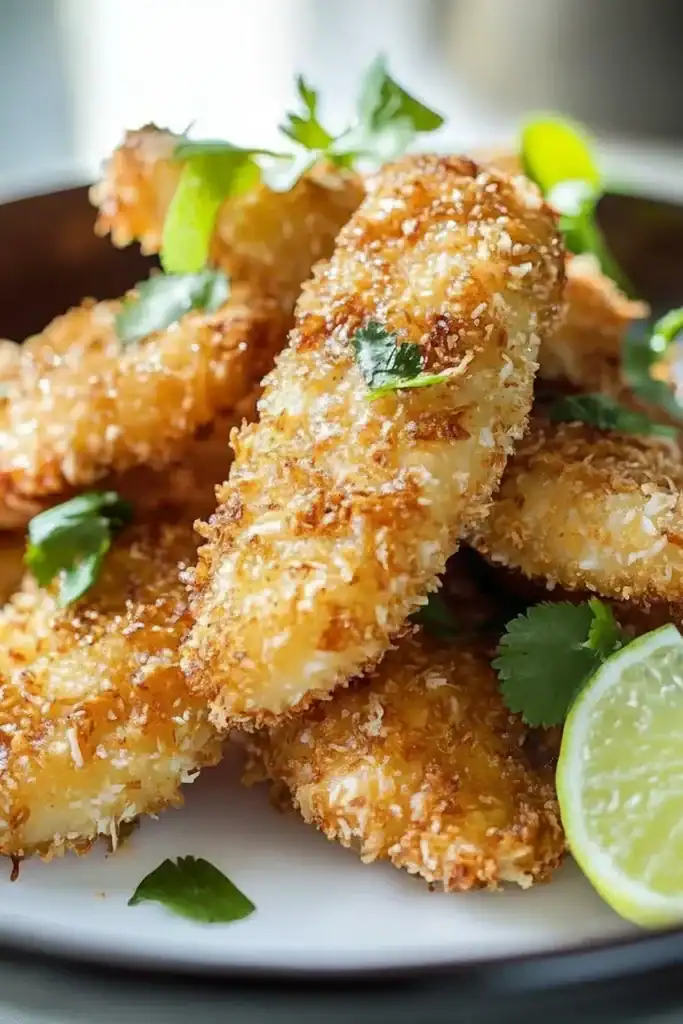
Coconut Chicken Tenders | Crispy Snack
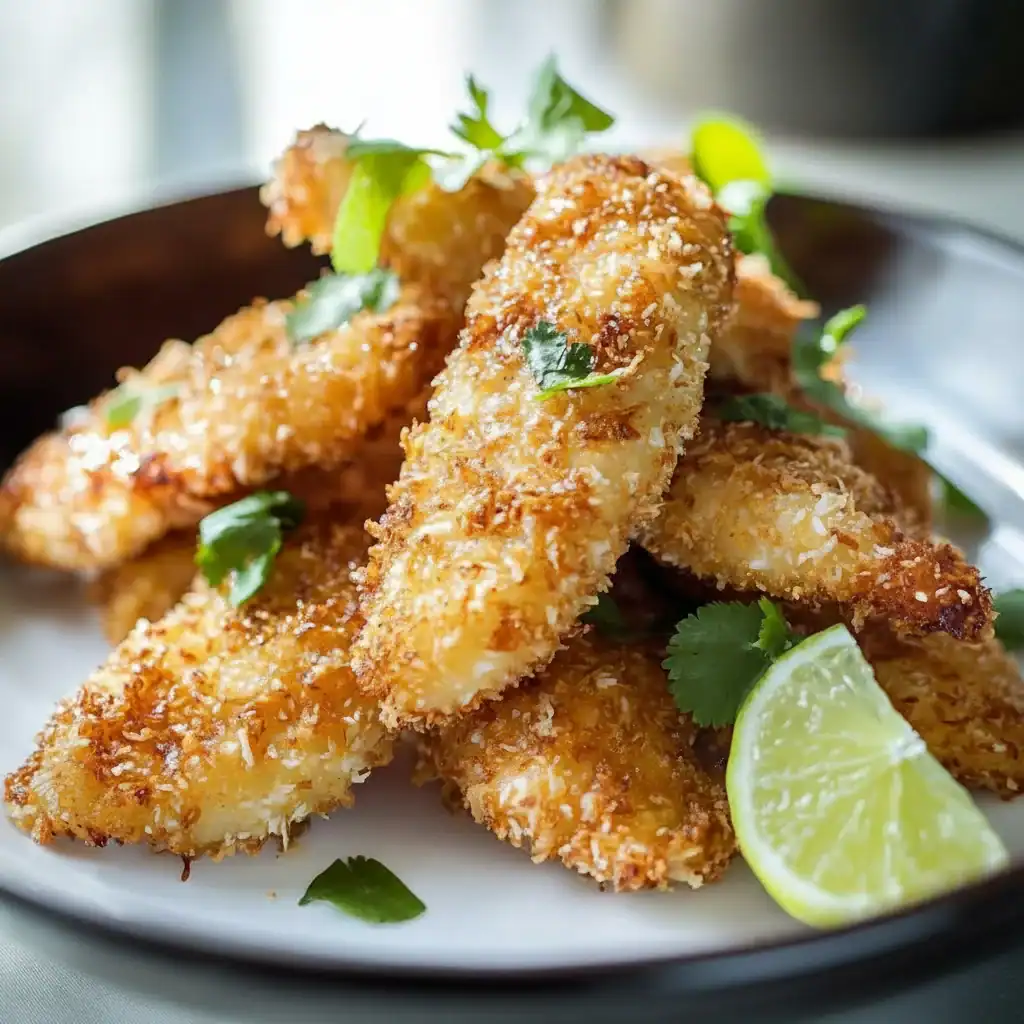
There’s something wonderfully satisfying about making a meal that feels a bit special, yet comes together without any fuss. These Coconut Chicken Tenders are exactly that. They have a delightful crispness from the toasted coconut, giving way to incredibly moist and tender chicken inside. I’ve been making this for over 8 years, and it never disappoints; it’s one of those recipes I turn to again and again for a guaranteed win at the dinner table.
What sets these apart from your average chicken tender is the texture and flavour. The unsweetened desiccated coconut creates a coating that’s both nutty and slightly sweet when it hits the hot oil, turning a beautiful golden brown. It’s a gentle, tropical note that elevates the humble chicken tender into something much more exciting. We’re not just making chicken here; we’re creating a little bite of sunshine.
This recipe works beautifully for a relaxed weekend lunch, as a fun family dinner, or even as a standout appetizer when you have friends over. Serve them with a simple sweet chilli and lime dipping sauce, and watch them disappear. They’re a brilliant way to make an ordinary evening feel a little more special.
Recipe Overview
This recipe guides you through creating exceptionally crispy and flavourful coconut chicken tenders from scratch. The method involves a straightforward three-step breading process that ensures the coconut coating sticks perfectly, creating a crunchy shell that keeps the chicken succulent. I’ve found through testing that letting the coated chicken rest for just a few minutes before frying is the key to a flawless finish. The result is a dish with a lovely balance of sweet, savoury, and nutty notes.
- Prep Time: 15 minutes
- Cook Time: 15 minutes
- Total Time: 30 minutes
- Servings: 4 people
- Difficulty: Easy
Why You’ll Love These Coconut Chicken Tenders
- Genuine Flavour: The taste is beautifully layered. You get the savoury seasoning on the chicken, followed by the warm, toasty, and slightly sweet flavour of the coconut crust. It’s a combination that always gets compliments.
- Ready in 30 Minutes: From prepping the chicken to serving, this entire dish comes together in about 30 minutes, making it ideal for a weeknight meal when you want something impressive without the long cooking time.
- Flexible Recipe: You can easily adjust the seasoning. Add a pinch of cayenne to the flour for a bit of heat, or mix in some smoked paprika for a deeper, smokier flavour. It’s very adaptable to your family’s tastes. For another take on chicken tenders, check out my Bacon Brown Sugar Chicken Tenders.
- Great for Gatherings: These are ideal when you need a simple but impressive appetizer. They can be served hot or at room temperature and are always one of the first things to go at a party.
- Family Tested: My kids absolutely devour this every time I make it. The slightly sweet crunch of the coconut makes it a real favourite, and they love dunking the tenders in the dipping sauce.
Ingredients You’ll Need
For the best results, start with good-quality ingredients. I always opt for free-range chicken breasts as they tend to be more tender. When it comes to the coconut, make sure you use unsweetened desiccated coconut. The sweetened variety contains extra sugar that can cause the coating to burn before the chicken is fully cooked.
- 700g boneless, skinless chicken breasts
- 100g plain flour
- 2 large free-range eggs
- 150g unsweetened desiccated coconut
- 1 tsp garlic powder
- 1 tsp onion powder
- 1 tsp fine sea salt
- ½ tsp freshly ground black pepper
- Vegetable or sunflower oil, for frying (about 500ml)
- For the Sweet Chilli Lime Sauce:
- 120ml sweet chilli sauce
- Juice of 1 large lime
- 1 tsp light soy sauce
Sophia’s Tip: Don’t be tempted to skip the garlic and onion powder in the flour. They seem like small additions, but they create a savoury base layer of flavour that prevents the final dish from tasting one-dimensionally sweet from the coconut.
How to Make Coconut Chicken Tenders
The process is all about setting up an efficient dredging station. Organise your bowls from left to right: one with the seasoned flour, one with the beaten eggs, and one with the coconut. This assembly-line approach makes the breading process smooth and less messy.
- Prepare the Chicken: Pat the chicken breasts dry with a paper towel. Slice them lengthwise into tenders, about 2-3 cm thick. This ensures they cook evenly and quickly.
- Set Up Your Breading Station: You’ll need three shallow dishes or bowls. In the first, combine the plain flour, garlic powder, onion powder, salt, and pepper. In the second, lightly whisk the two eggs. In the third, place the desiccated coconut. Arrange them in a line.
- Dredge the Chicken: Working with one piece at a time, first coat a chicken tender thoroughly in the seasoned flour mixture and shake off any excess. Next, dip it into the beaten egg, allowing any excess to drip off. Finally, press it firmly into the desiccated coconut, ensuring it’s completely coated on all sides. What works best for me is using one hand for the dry ingredients and the other for the wet to avoid clumpy fingers.
- Let Them Rest: Place the coated chicken tenders on a wire rack in a single layer. Let them rest for 5-10 minutes. This crucial step helps the coating adhere to the chicken and prevents it from falling off during frying.
- Heat the Oil: While the chicken is resting, pour enough oil into a large, heavy-bottomed frying pan or skillet to come about 2cm up the sides. Heat the oil over a medium-high heat until it reaches about 175°C. If you don’t have a thermometer, a small piece of coating dropped in should sizzle immediately.
- Fry the Tenders: Carefully place the chicken tenders into the hot oil, ensuring not to overcrowd the pan. Cook in batches if necessary. Fry for 3-4 minutes on each side, until the coating is a deep golden brown and the chicken is cooked through.
- Drain and Serve: Once cooked, remove the tenders from the pan using tongs and place them back on the wire rack to drain any excess oil. This keeps them wonderfully crispy. Sprinkle with a little extra salt while they are still hot. For another delicious chicken dish, try my Bang Bang Chicken Thighs.
- Make the Dipping Sauce: While the chicken is frying, simply whisk together the sweet chilli sauce, fresh lime juice, and soy sauce in a small bowl. Serve alongside the hot chicken tenders.
Tips From My Kitchen
- Temperature Control: Maintaining the correct oil temperature is vital. If the oil is too hot, the coconut will burn before the chicken inside is cooked. Too cool, and the tenders will absorb oil and become greasy. A steady medium-high heat is your goal.
- The Secret Step: I learned that the short resting period after breading is non-negotiable for a coating that stays put. It allows the flour, egg, and coconut to form a solid crust. For more on breading techniques, Serious Eats has a great breakdown of the science behind it.
- Make-Ahead: You can prepare the tenders up to the point of frying. Just arrange the coated, uncooked tenders on a baking tray lined with parchment paper, cover with cling film, and refrigerate for up to 4 hours.
- Storage: Leftovers can be stored in an airtight container in the refrigerator for up to 3 days. To restore their crispiness, reheat them in an oven or air fryer at 190°C for 5-7 minutes.
Equipment You’ll Need
- Large, heavy-bottomed frying pan or skillet
- Sharp knife and cutting board
- Three shallow bowls or dishes for breading
- Tongs
- Wire cooling rack
Common Mistakes to Avoid
- Overcrowding the pan: Frying too many tenders at once will cause the oil temperature to drop significantly. This steams the chicken rather than frying it, resulting in a soggy coating. Always cook in batches, leaving plenty of space around each tender.
- Wrong temperature: Frying at too low a temperature leads to greasy chicken, while too high a temperature burns the delicate coconut. Aim for a consistent 175°C for that perfect golden finish.
- Skipping the rest time: If you drop the tenders straight into the oil after breading, the coating is more likely to slide off. That 5-10 minute rest allows the egg to act like glue, binding the coconut securely to the chicken.
Delicious Variations to Try
Once you’ve mastered the basic recipe, feel free to experiment! This dish is a great canvas for other flavours.
- Spicy Version: For a bit of a kick, add 1/2 teaspoon of cayenne pepper or hot chilli powder to your flour mixture.
- Extra Crunchy: For an even crispier texture, mix the desiccated coconut with an equal amount of panko breadcrumbs. The panko adds another layer of crunch that is truly delightful.
- Different Protein: This coconut coating works wonderfully with other proteins. Try it on large king prawns (adjust cooking time to just 1-2 minutes per side) or on thin slices of pork loin for a different take.
What to Serve With Coconut Chicken Tenders
These tenders are quite versatile and pair well with a range of sides. Here are a few of my favourite combinations:
- Sweet Potato Fries: The sweetness of the fries complements the coconut flavour beautifully. A sprinkling of sea salt on the fries balances everything out.
- Mango and Avocado Salad: A fresh, vibrant salad with chunks of ripe mango, creamy avocado, red onion, and a lime-coriander dressing provides a cool, refreshing contrast to the warm, crispy chicken.
- Drink Pairing: A cold, crisp lager or a chilled glass of Sauvignon Blanc works wonderfully, as their acidity cuts through the richness of the fried chicken. For a non-alcoholic option, a sparkling lime and mint cooler is perfect.
- For a truly indulgent meal, you could even follow it up with a slice of my Peach Crumb Cheesecake.
Frequently Asked Questions
Coconut Chicken Tenders
Ingredients
Method
- Prepare the Chicken: Pat the chicken breasts dry with a paper towel. Slice them lengthwise into tenders, about 2-3 cm thick. This ensures they cook evenly and quickly.
- Set Up Your Breading Station: You'll need three shallow dishes or bowls. In the first, combine the plain flour, garlic powder, onion powder, salt, and pepper. In the second, lightly whisk the two eggs. In the third, place the desiccated coconut. Arrange them in a line.
- Dredge the Chicken: Working with one piece at a time, first coat a chicken tender thoroughly in the seasoned flour mixture and shake off any excess. Next, dip it into the beaten egg, allowing any excess to drip off. Finally, press it firmly into the desiccated coconut, ensuring it’s completely coated on all sides. What works best for me is using one hand for the dry ingredients and the other for the wet to avoid clumpy fingers.
- Let Them Rest: Place the coated chicken tenders on a wire rack in a single layer. Let them rest for 5-10 minutes. This crucial step helps the coating adhere to the chicken and prevents it from falling off during frying.
- Heat the Oil: While the chicken is resting, pour enough oil into a large, heavy-bottomed frying pan or skillet to come about 2cm up the sides. Heat the oil over a medium-high heat until it reaches about 175°C. If you don't have a thermometer, a small piece of coating dropped in should sizzle immediately.
- Fry the Tenders: Carefully place the chicken tenders into the hot oil, ensuring not to overcrowd the pan. Cook in batches if necessary. Fry for 3-4 minutes on each side, until the coating is a deep golden brown and the chicken is cooked through.
- Drain and Serve: Once cooked, remove the tenders from the pan using tongs and place them back on the wire rack to drain any excess oil. This keeps them wonderfully crispy. Sprinkle with a little extra salt while they are still hot. For another delicious chicken dish, try my Bang Bang Chicken Thighs.
- Make the Dipping Sauce: While the chicken is frying, simply whisk together the sweet chilli sauce, fresh lime juice, and soy sauce in a small bowl. Serve alongside the hot chicken tenders.
Notes
I really hope you and your family enjoy these Coconut Chicken Tenders as much as we do. They are a true testament to how simple ingredients can create something truly special and delicious. I’d love to hear how yours turn out, so please feel free to leave a comment below and share your experience!
From my kitchen to yours,
Sophia