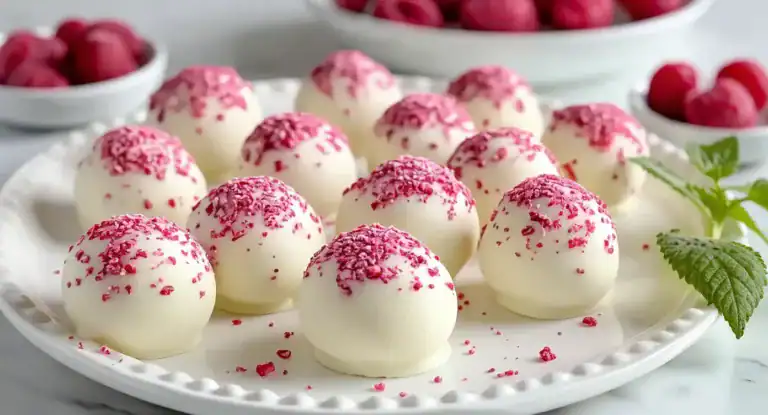
Fluffy Chocolate Cool Whip Candy
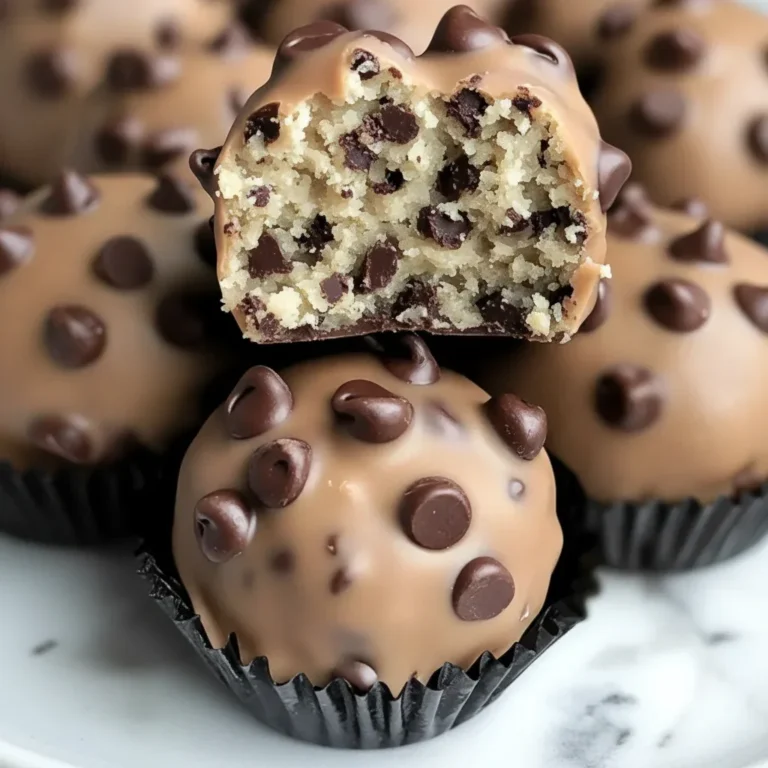
There are some recipes that feel like pure, unadulterated magic. This Cool Whip Candy is one of them. It’s a delightful treat that transforms a humble tub of frozen whipped topping into something truly special: ethereal, creamy bites encased in a crisp chocolate shell. I stumbled upon this combination by accident one afternoon when I had leftover Cool Whip from making my Peach Crumb Cheesecake and a craving for something sweet. The result was this incredible whip candy, which has been a staple in my freezer ever since.
What makes this particular candy recipe so wonderful is the texture. The centre is unbelievably light and airy, almost like a frozen mousse, which melts in your mouth the moment you bite into it. This soft, creamy interior provides a beautiful contrast to the snappy, rich chocolate coating. It’s a simple concept, but the final product feels sophisticated and utterly indulgent.
This is the kind of treat that works beautifully for so many occasions. It’s a fantastic little sweet to have stashed in the freezer for when friends pop over for coffee, and it’s always a talking point when I add it to a dessert platter. The recipe is straightforward, and the resulting chocolate candy looks so professional, you’ll feel like a master chocolatier.
Recipe Overview
This Cool Whip Candy recipe creates small, truffle-like frozen treats with a light, mousse-like centre and a crisp chocolate shell. The flavour is a delightful balance of creamy sweetness from the whip candy filling and the rich, deep notes of the dark chocolate coating. When I first tested this, I found that letting the initial chocolate cool for a few minutes before mixing it into the Cool Whip is crucial to prevent the whip from deflating.
- Prep Time: 20 minutes
- Cook Time: 5 minutes
- Total Time: 3 hours 25 minutes (includes freezing)
- Servings: 24 candies
- Difficulty: Easy
Why You’ll Love This Cool Whip Candy
- Sublime Texture and Flavour: The filling isn’t just sweet; it’s airy and has a delicate vanilla-kissed flavour that contrasts beautifully with the slight bitterness of a good dark chocolate shell. The snap of the chocolate followed by the melt-in-your-mouth centre is just divine.
- Ready in Under 30 Minutes (Active Time): While the freezing takes time, the actual hands-on work to prepare these candies comes together in about 25 minutes. It’s a brilliant recipe when you want to make something impressive without spending hours in the kitchen.
- Flexible Recipe: This is a wonderful base for customisation. You can swirl in peanut butter, add a drop of peppermint extract for a festive twist, or roll the finished candies in chopped nuts or desiccated coconut.
- Great for Gifting: These little gems are ideal for homemade food gifts during the holidays or as a thank-you treat. Pack them in a small box lined with baking parchment, and they look incredibly special. Friends always ask me for this recipe after trying it at dinner parties.
- Family Tested: My children adore these! They call them “chocolate clouds,” and they are always the first thing to disappear from the dessert table. It’s a sweet treat that feels both fun for kids and elegant enough for adults.
Ingredients You’ll Need
The beauty of this recipe lies in its simplicity. For the chocolate, I highly recommend using a good quality brand like Callebaut or Green & Black’s, as its flavour is front and centre. You’ll want chocolate with at least 50% cocoa solids for a nice balance.
- 225g tub of Cool Whip (or similar frozen stabilised whipped topping), thawed in the fridge
- 100g dark chocolate chips (or a finely chopped bar)
- 30g icing sugar, sifted
- 1 tsp vanilla extract
- For the Chocolate Coating:
- 200g dark or milk chocolate chips
- 1 tbsp coconut oil (this helps the chocolate set with a lovely gloss and snap)
- Optional: Sprinkles, chopped nuts, or sea salt flakes for decoration
Sophia’s Tip: Make sure your Cool Whip is fully thawed in the refrigerator, not at room temperature. If it gets too warm, the filling won’t have that light, airy texture we’re aiming for.
How to Make Cool Whip Candy
The process for this chocolate candy is all about temperature and patience. Don’t rush the freezing steps – they are essential for getting a clean dip and a perfect finish. We’ll start by making the creamy filling, freezing it, and then giving it a final chocolate bath.
- Line a large baking tray or sheet pan with baking parchment. This is vital to prevent the candies from sticking.
- In a small, microwave-safe bowl, melt the 100g of dark chocolate chips. I do this in 20-second bursts, stirring in between each, until it’s smooth. Set it aside to cool for about 10 minutes. It should be barely warm to the touch.
- In a medium mixing bowl, gently combine the thawed Cool Whip, sifted icing sugar, and vanilla extract. Be careful not to overmix and deflate the whip.
- Pour the cooled, melted chocolate into the Cool Whip mixture. Gently fold it in with a spatula until it’s just combined. You can leave a few streaks for a marbled effect or mix until uniform.
- Using two teaspoons or a small cookie scoop, drop rounded tablespoon-sized mounds of the mixture onto your prepared baking tray. Space them out a little. You should get around 24 mounds.
- Place the tray in the freezer for at least 2 hours, or until the mounds are completely firm to the touch. This is the most important step for ensuring they don’t melt when you dip them.
- Once the centres are frozen solid, prepare the coating. Melt the 200g of chocolate and the 1 tbsp of coconut oil together in the microwave, using the same 20-second interval method. Stir until completely smooth and glossy.
- Working quickly, take a few frozen mounds from the freezer at a time (leave the rest in). Using two forks, dip one mound at a time into the melted chocolate, turning to coat it completely. Lift it out, letting any excess chocolate drip off.
- Place the chocolate-coated candy back onto the parchment-lined tray. If you’re using sprinkles or sea salt, add them immediately before the chocolate sets. I find that the chocolate sets very fast on the frozen centres.
- Repeat with the remaining frozen mounds. Once all are coated, return the tray to the freezer for another 30 minutes to allow the chocolate shell to set completely hard.
Tips From My Kitchen
- Temperature Control: The single most important factor here is temperature. Your Cool Whip mixture must be frozen solid before dipping. If it’s even slightly soft, it will melt into the warm chocolate, creating a mess. Work in small batches, keeping the rest of the mounds in the freezer.
- The Secret Step: Adding a spoonful of coconut oil to the chocolate coating is a trick I swear by. It not only gives the shell a beautiful, professional-looking gloss but also helps it melt more smoothly and creates a thinner, snappier coating.
- Make-Ahead: This candy recipe is fantastic for making in advance. You can make the frozen centres and keep them in an airtight container in the freezer for up to a month before you’re ready to dip them in chocolate.
- Storage: These must be stored in the freezer. Place them in a single layer in an airtight container. They will keep beautifully for up to 3 months. Let them sit at room temperature for just a minute or two before serving for the best texture.
Equipment You’ll Need
- Large baking tray
- Baking parchment
- Microwave-safe bowls
- Spatula
- Two teaspoons or a small cookie scoop
- Two forks (for dipping)
Common Mistakes to Avoid
- Rushing the Freezing Time: If the Cool Whip mounds aren’t frozen solid, they will disintegrate in the warm chocolate coating. Two hours is the minimum; longer is even better. You should be able to pick one up without it feeling soft at all.
- Overheating the Chocolate: When melting your chocolate, do it gently. If it gets too hot, it can become grainy or “seize.” Short bursts in the microwave with stirring in between is the safest method. For more on handling chocolate, Serious Eats has a great guide to melting and tempering.
- Dipping with Your Fingers: Don’t be tempted to use your fingers! The heat from your hands will melt the frozen centres. Using two forks gives you much better control and keeps the process clean and efficient.
Delicious Variations to Try
Once you’ve mastered the basic Cool Whip Candy, it’s so much fun to experiment. Here are a few variations that we love in my house:
- Mint Chocolate Version: Add 1/2 teaspoon of peppermint extract to the Cool Whip mixture along with the vanilla. This creates a refreshing treat reminiscent of an After Eight.
- Peanut Butter Swirl: After folding in the melted chocolate, add 3-4 tablespoons of smooth peanut butter to the bowl and gently swirl it through with a knife just once or twice before scooping. For more peanut butter goodness, you could try my Peanut Butter Truffles recipe.
- Biscoff Twist: For a spiced caramel flavour, fold in 3 tablespoons of Biscoff spread into the Cool Whip mixture. It’s absolutely divine and pairs wonderfully with a milk chocolate coating. If you love that flavour, my Biscoff Truffles are another must-try.
What to Serve With Cool Whip Candy
These are a standalone treat, but they also work brilliantly as part of a larger dessert spread. Here’s how I like to serve them:
- Coffee or Tea: Their rich flavour and cool temperature are a wonderful contrast to a hot cup of coffee or black tea after dinner.
- Dessert Platter: Arrange them on a platter with fresh berries, like raspberries and strawberries, and some simple biscuits or shortbread. The fruit’s tartness cuts through the richness of the chocolate.
- Wine Pairing: A sweet dessert wine like a late-harvest Riesling or even a glass of Port complements the deep chocolate notes beautifully.
Frequently Asked Questions
Cool Whip Candy
Ingredients
Method
- Line a large baking tray or sheet pan with baking parchment. This is vital to prevent the candies from sticking.
- In a small, microwave-safe bowl, melt the 100g of dark chocolate chips. I do this in 20-second bursts, stirring in between each, until it's smooth. Set it aside to cool for about 10 minutes. It should be barely warm to the touch.
- In a medium mixing bowl, gently combine the thawed Cool Whip, sifted icing sugar, and vanilla extract. Be careful not to overmix and deflate the whip.
- Pour the cooled, melted chocolate into the Cool Whip mixture. Gently fold it in with a spatula until it's just combined. You can leave a few streaks for a marbled effect or mix until uniform.
- Using two teaspoons or a small cookie scoop, drop rounded tablespoon-sized mounds of the mixture onto your prepared baking tray. Space them out a little. You should get around 24 mounds.
- Place the tray in the freezer for at least 2 hours, or until the mounds are completely firm to the touch. This is the most important step for ensuring they don't melt when you dip them.
- Once the centres are frozen solid, prepare the coating. Melt the 200g of chocolate and the 1 tbsp of coconut oil together in the microwave, using the same 20-second interval method. Stir until completely smooth and glossy.
- Working quickly, take a few frozen mounds from the freezer at a time (leave the rest in). Using two forks, dip one mound at a time into the melted chocolate, turning to coat it completely. Lift it out, letting any excess chocolate drip off.
- Place the chocolate-coated candy back onto the parchment-lined tray. If you're using sprinkles or sea salt, add them immediately before the chocolate sets. I find that the chocolate sets very fast on the frozen centres.
- Repeat with the remaining frozen mounds. Once all are coated, return the tray to the freezer for another 30 minutes to allow the chocolate shell to set completely hard.
Notes
I do hope you give this delightful Cool Whip Candy a try. It’s such a simple idea but produces such an elegant and satisfying result. It’s one of those recipes that brings a little bit of joy, and we can all use more of that. Let me know how you get on in the comments below – I’d love to hear if you try any fun variations!
Happy cooking,
Sophia