Maple Pecan Sticky Buns Recipe | Gooey
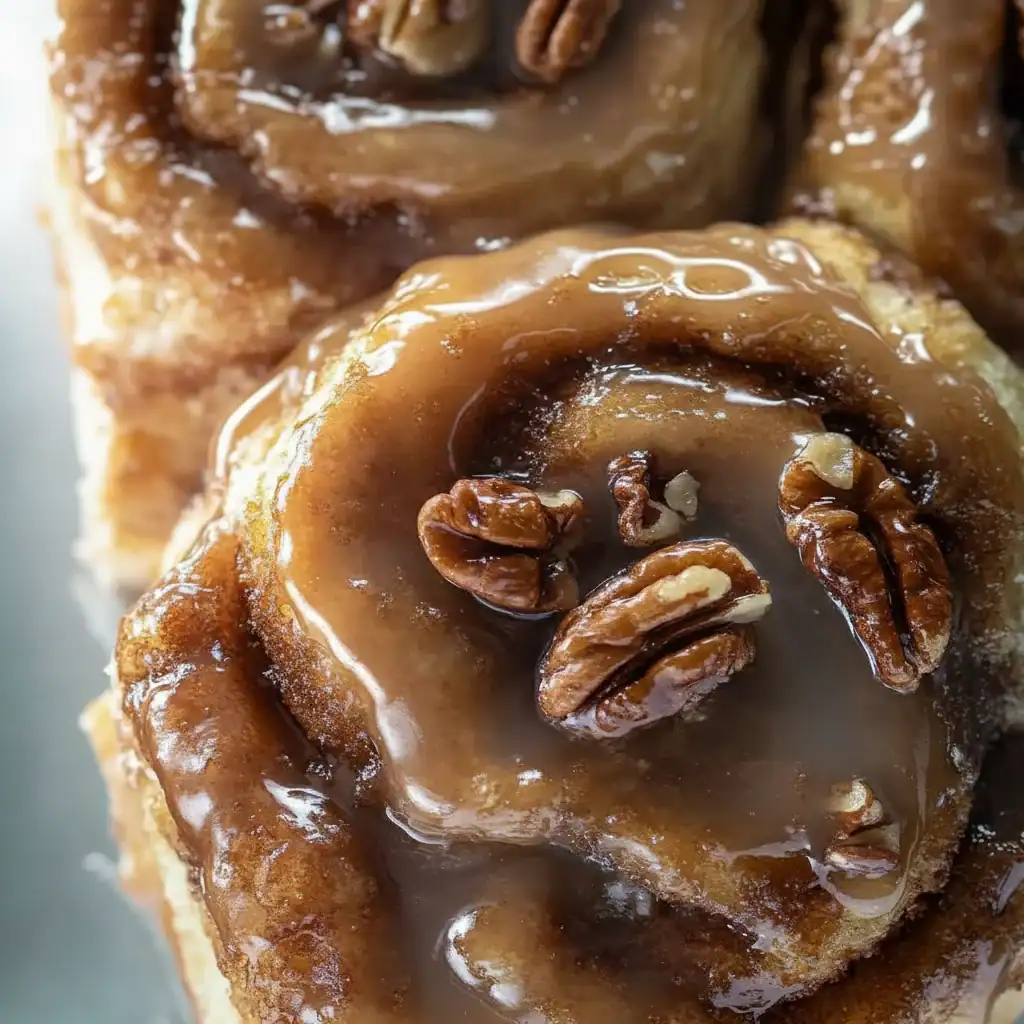
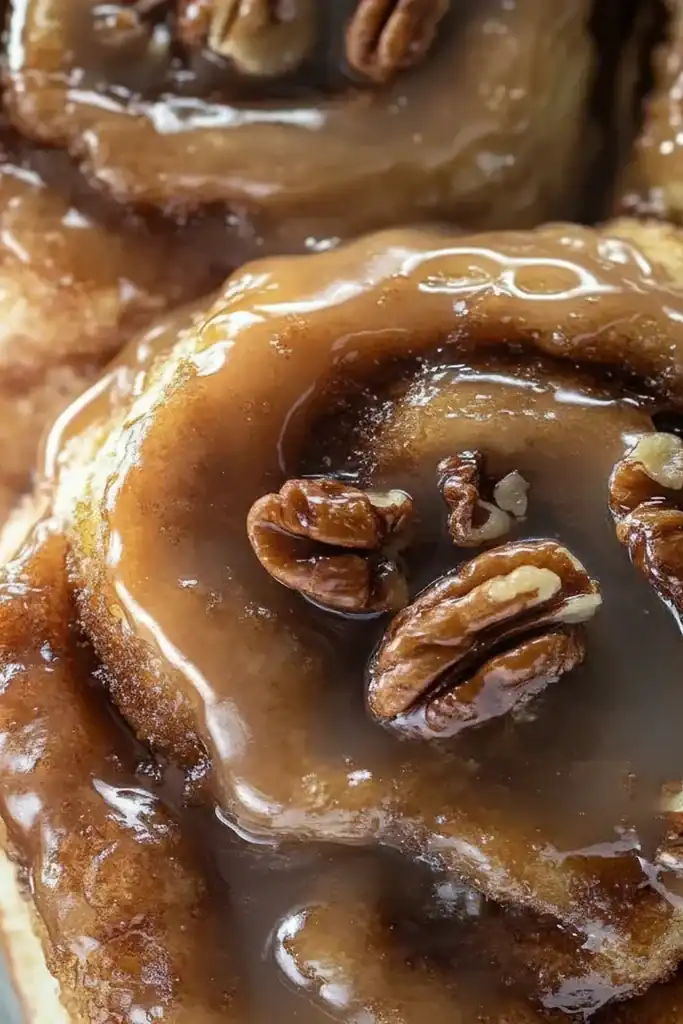
There’s a particular aroma that signals a truly special morning in my house: the scent of warm yeast, toasted nuts, and sweet, bubbling maple syrup. It’s the smell of these Maple Pecan Sticky Buns, a recipe that transforms a weekend breakfast into a memorable event. Forget dry, disappointing pastries; we’re talking about a gloriously soft, pillowy dough, rolled with a buttery cinnamon filling and baked in a pool of rich maple caramel. The pecans become perfectly toasted and candied in the sauce, offering a delightful crunch in every gooey, decadent bite. I stumbled upon this combination by accident when I ran out of brown sugar for a classic sticky bun recipe, and it’s been a hit ever since.
This is the kind of breakfast pastry that brings everyone to the kitchen. It’s ideal for those slow, lazy Sunday mornings when you have a bit more time, or for a festive brunch during the holidays. The process of making them—kneading the soft dough, watching it rise, rolling it out, and finally inverting the pan to reveal the glossy, pecan-studded tops—is deeply satisfying. What we love most is that while they look incredibly impressive, the steps are straightforward and rewarding.
Whether you’re an experienced baker or looking for a special project, this maple pecan sticky buns recipe will guide you through creating the most delicious, soft, and gooey buns imaginable. They are a true treat, and sharing a warm pan of these with family and a fresh pot of coffee is one of my favourite kitchen moments.
Recipe Overview
This recipe guides you through creating classic sticky buns with a rich maple and pecan topping. We start with a soft, enriched dough that gets two rises for a wonderfully light texture. The magic happens in the pan, where a simple mixture of butter, maple syrup, and pecans creates a gooey caramel sauce as the buns bake. After testing this recipe five times, I finally got it just right—the sauce is the perfect consistency, neither too thin nor too sugary, and it soaks beautifully into the base of each bun.
- Prep Time: 30 minutes active time
- Cook Time: 25-30 minutes
- Total Time: 2 hours 30 minutes (includes proofing)
- Servings: 12 buns
- Difficulty: Medium
Why You’ll Love This Maple Pecan Sticky Buns Recipe
- Genuine Maple Flavour: We use pure maple syrup in the topping, which creates a deep, authentic caramel that isn’t just sugary sweet. It has a beautiful, almost smoky note that pairs wonderfully with the buttery, toasted pecans.
- Incredibly Soft Texture: The enriched dough, made with milk, egg, and butter, bakes up into the most tender, pillowy buns that pull apart with satisfying softness. It’s a texture that stays soft for days.
- A Rewarding Baking Project: While there’s proofing time involved, the active work comes together in about 30 minutes. It’s a wonderful way to spend a morning, with a truly impressive result.
- Ideal for Special Occasions: This maple pecan sticky buns recipe works beautifully for Christmas morning, an Easter brunch, or whenever you have guests staying over. It makes the whole house smell absolutely divine.
- Family Tested: My children can smell these baking from upstairs and are always waiting by the oven for the moment they come out. This recipe always gets compliments and requests for a second helping.
Ingredients You’ll Need
For the best results, use good quality ingredients, especially the maple syrup. I always opt for a dark amber or Grade A Dark Colour, Robust Taste Canadian maple syrup, as its intense flavour really shines through in the caramel topping. Make sure your butter is at room temperature for both the dough and the filling to ensure it incorporates smoothly.
- For the Dough:
- 240ml whole milk, warmed to 40-43°C
- 7g (2 ¼ tsp) active dry yeast
- 50g granulated sugar
- 1 large free-range egg, at room temperature
- 60g unsalted butter, melted and slightly cooled
- 420g strong white bread flour, plus extra for dusting
- 1 tsp salt
- For the Topping:
- 115g unsalted butter
- 150g soft light brown sugar, packed
- 120ml pure maple syrup
- 1 tsp vanilla extract
- A pinch of sea salt
- 150g pecan halves
- For the Filling:
- 60g unsalted butter, very soft
- 50g soft light brown sugar, packed
- 1 tbsp ground cinnamon
Sophia’s Tip: Don’t overheat your milk! If it’s too hot, it will kill the yeast. A digital thermometer is your best friend here, but if you don’t have one, it should feel like a warm bath—comfortably warm to the touch, but not hot.
How to Make Maple Pecan Sticky Buns
The process involves making a simple yeasted dough, preparing the gooey topping in the baking pan, and then assembling the buns. The final flip is the most exciting part! We’ll walk through it step-by-step.
- Activate the Yeast: In the bowl of a stand mixer (or a large mixing bowl), combine the warm milk, yeast, and 1 tablespoon of the granulated sugar. Give it a gentle whisk and let it stand for 5-10 minutes until it becomes foamy and fragrant. This shows your yeast is active.
- Make the Dough: To the yeast mixture, add the remaining granulated sugar, the beaten egg, and the melted butter. Fit the stand mixer with the dough hook and add the flour and salt. Mix on low speed until a shaggy dough forms. Increase the speed to medium-low and knead for 6-8 minutes, until the dough is smooth, elastic, and pulls away from the sides of the bowl. If kneading by hand, do so on a lightly floured surface for about 10 minutes.
- First Proof: Lightly grease a large bowl with oil or butter. Form the dough into a ball and place it in the bowl, turning it over to coat lightly. Cover the bowl with a clean tea towel or cling film and place it in a warm, draught-free spot to rise for 1 to 1.5 hours, or until it has doubled in size.
- Prepare the Topping: While the dough rises, prepare the topping. In a small saucepan over medium heat, melt the 115g of butter. Stir in the 150g of brown sugar, maple syrup, vanilla, and salt. Bring to a simmer and cook for 1-2 minutes, stirring constantly, until the sugar is dissolved and the mixture is smooth. Pour this mixture into the bottom of a 23cm x 33cm (9×13 inch) baking pan and spread evenly. Sprinkle the pecan halves over the caramel.
- Shape the Buns: Once the dough has risen, gently deflate it on a lightly floured work surface. Roll it out into a rectangle approximately 30cm x 40cm (12×16 inches). Spread the 60g of very soft butter evenly over the surface. In a small bowl, mix the 50g of brown sugar and cinnamon, then sprinkle this mixture evenly over the butter.
- Roll and Cut: Starting from the long edge, roll the dough into a tight log. I find that using a bench scraper helps keep the roll tight and even. Pinch the seam to seal it. Using a sharp serrated knife or unflavoured dental floss, cut the log into 12 equal-sized rolls (about 3cm or 1.25 inches thick).
- Second Proof: Arrange the cut rolls evenly in the prepared baking pan on top of the pecan-caramel mixture. Cover the pan loosely with cling film and let the buns rise again in a warm place for 30-45 minutes, until they look puffy and are touching each other. While they rise, preheat your oven to 180°C (160°C fan).
- Bake the Sticky Buns: Bake for 25-30 minutes, until the tops are a deep golden brown and the caramel is bubbling around the edges. If they start browning too quickly, you can loosely tent the pan with foil for the last 5-10 minutes.
- Invert and Serve: Let the pan cool on a wire rack for just 5 minutes—no longer, or the caramel will set too firmly. Carefully place a large serving platter or baking sheet over the pan. Wearing oven gloves, confidently and quickly flip the pan over. Lift the pan away; the buns and all the gooey topping should release. Scrape any remaining pecans and sauce from the pan onto the buns. Serve warm.
Tips From My Kitchen
- Temperature Control is Key: The success of any yeasted dough hinges on temperature. Your milk must be warm enough to activate the yeast but not hot enough to kill it (around 40°C is perfect). Likewise, a warm, not hot, spot for proofing encourages a steady, even rise.
- The Secret to an Extra Gooey Top: I learned that for an even richer, gooier topping, you can pour 60ml of double cream over the buns just before they go into the oven. It mingles with the maple caramel to create an unbelievably luscious sauce.
- Make-Ahead Method: You can prepare these buns the night before. After arranging them in the pan (step 7), cover tightly with cling film and refrigerate overnight. The next morning, take them out of the fridge and let them sit at room temperature for about 1 hour to take the chill off and finish rising before baking as directed.
- Storage: Sticky buns are best enjoyed on the day they are made. However, leftovers can be stored in an airtight container at room temperature for up to 2 days. Reheat individual buns in the microwave for 15-20 seconds to soften them up again.
Equipment You’ll Need
- Stand mixer with dough hook (or large mixing bowl)
- 23cm x 33cm (9×13 inch) baking pan
- Rolling pin
- Small saucepan
- Sharp serrated knife or unflavoured dental floss
- Large serving platter or baking sheet
Common Mistakes to Avoid
- Cutting with a Dull Knife: Using a dull knife will squash your beautifully rolled log. A sharp serrated knife used in a gentle sawing motion works well. Even better, slide a piece of unflavoured dental floss under the log, cross the ends over the top, and pull to get a perfectly clean cut every time.
- Incorrect Proofing: Under-proofing will result in dense, heavy buns. Over-proofing can cause them to collapse in the oven. The dough should look visibly puffy and spring back slowly when you gently poke it, as explained in this helpful guide on the science of proofing.
- Waiting Too Long to Invert: It can be tempting to let the pan cool down completely, but this is a mistake! If you wait longer than 5-10 minutes, the maple caramel will begin to set and will stick to the bottom of the pan instead of coating your buns. Flip them while they’re still hot.
Delicious Variations to Try
Once you’ve mastered this maple pecan sticky buns recipe, it’s fun to experiment. The dough is a wonderful canvas for other flavours, just like in my Apple Cider Whoopie Pies.
- Different Nuts & Spices: Swap the pecans for walnuts or even chopped hazelnuts. For a warmer spice profile, add ½ teaspoon of ground cardamom or nutmeg to the cinnamon filling. A little orange zest in the filling is also a fantastic addition.
- Chocolate Chip Sticky Buns: Sprinkle a generous handful of dark chocolate chips over the cinnamon-sugar filling before rolling up the dough. The melted chocolate pairs beautifully with the maple caramel.
- Savoury Twist: For something completely different, try a savoury version. Omit the topping and filling, and instead fill the dough with pesto, Parmesan, and sun-dried tomatoes, or perhaps cheddar and chopped bacon, reminiscent of the flavours in this Bacon Brown Sugar Chicken Tenders recipe.
What to Serve With Maple Pecan Sticky Buns
These buns are a magnificent breakfast all on their own, but they also pair wonderfully with a few simple accompaniments to make a full brunch spread.
- Freshly Brewed Coffee: A strong, dark roast coffee or a creamy latte cuts through the sweetness of the caramel beautifully.
- Crispy Bacon or Sausages: The salty, savoury flavour of well-cooked bacon provides a fantastic contrast to the sweet, gooey buns.
- Fresh Fruit Salad: A simple bowl of mixed berries, melon, and citrus offers a light, refreshing counterpoint to the richness of the pastry.
Frequently Asked Questions
Maple Pecan Sticky Buns
Ingredients
Method
- Activate the Yeast: In the bowl of a stand mixer (or a large mixing bowl), combine the warm milk, yeast, and 1 tablespoon of the granulated sugar. Give it a gentle whisk and let it stand for 5-10 minutes until it becomes foamy and fragrant. This shows your yeast is active.
- Make the Dough: To the yeast mixture, add the remaining granulated sugar, the beaten egg, and the melted butter. Fit the stand mixer with the dough hook and add the flour and salt. Mix on low speed until a shaggy dough forms. Increase the speed to medium-low and knead for 6-8 minutes, until the dough is smooth, elastic, and pulls away from the sides of the bowl. If kneading by hand, do so on a lightly floured surface for about 10 minutes.
- First Proof: Lightly grease a large bowl with oil or butter. Form the dough into a ball and place it in the bowl, turning it over to coat lightly. Cover the bowl with a clean tea towel or cling film and place it in a warm, draught-free spot to rise for 1 to 1.5 hours, or until it has doubled in size.
- Prepare the Topping: While the dough rises, prepare the topping. In a small saucepan over medium heat, melt the 115g of butter. Stir in the 150g of brown sugar, maple syrup, vanilla, and salt. Bring to a simmer and cook for 1-2 minutes, stirring constantly, until the sugar is dissolved and the mixture is smooth. Pour this mixture into the bottom of a 23cm x 33cm (9x13 inch) baking pan and spread evenly. Sprinkle the pecan halves over the caramel.
- Shape the Buns: Once the dough has risen, gently deflate it on a lightly floured work surface. Roll it out into a rectangle approximately 30cm x 40cm (12x16 inches). Spread the 60g of very soft butter evenly over the surface. In a small bowl, mix the 50g of brown sugar and cinnamon, then sprinkle this mixture evenly over the butter.
- Roll and Cut: Starting from the long edge, roll the dough into a tight log. I find that using a bench scraper helps keep the roll tight and even. Pinch the seam to seal it. Using a sharp serrated knife or unflavoured dental floss, cut the log into 12 equal-sized rolls (about 3cm or 1.25 inches thick).
- Second Proof: Arrange the cut rolls evenly in the prepared baking pan on top of the pecan-caramel mixture. Cover the pan loosely with cling film and let the buns rise again in a warm place for 30-45 minutes, until they look puffy and are touching each other. While they rise, preheat your oven to 180°C (160°C fan).
- Bake the Sticky Buns: Bake for 25-30 minutes, until the tops are a deep golden brown and the caramel is bubbling around the edges. If they start browning too quickly, you can loosely tent the pan with foil for the last 5-10 minutes.
- Invert and Serve: Let the pan cool on a wire rack for just 5 minutes—no longer, or the caramel will set too firmly. Carefully place a large serving platter or baking sheet over the pan. Wearing oven gloves, confidently and quickly flip the pan over. Lift the pan away; the buns and all the gooey topping should release. Scrape any remaining pecans and sauce from the pan onto the buns. Serve warm.
Notes
I truly hope you enjoy making this maple pecan sticky buns recipe as much as my family and I enjoy eating them. There’s nothing quite like the satisfaction of pulling a pan of these warm, gooey treats from the oven. If you give them a try, I’d love to hear how they turned out for you. Please leave a comment below and let me know your thoughts! Happy baking! – Sophia