Mouthwatering Slutty Brownies with Oreo Filling
The Ultimate Slutty Brownies Recipe: A Decadent Triple-Layer Treat
We’ve all faced that sweet predicament: should we bake a batch of warm, chewy chocolate chip cookies, enjoy the classic crunch of an Oreo, or indulge in a deeply rich, gooey brownie? It’s a genuine struggle for anyone with a sweet tooth. But what if we told you there’s no need to choose? Imagine combining all three of those glorious treats into one single, magnificent bite. Allow us to introduce you to the legendary Slutty Brownies, quite possibly the most outrageously delicious bake you will ever create.
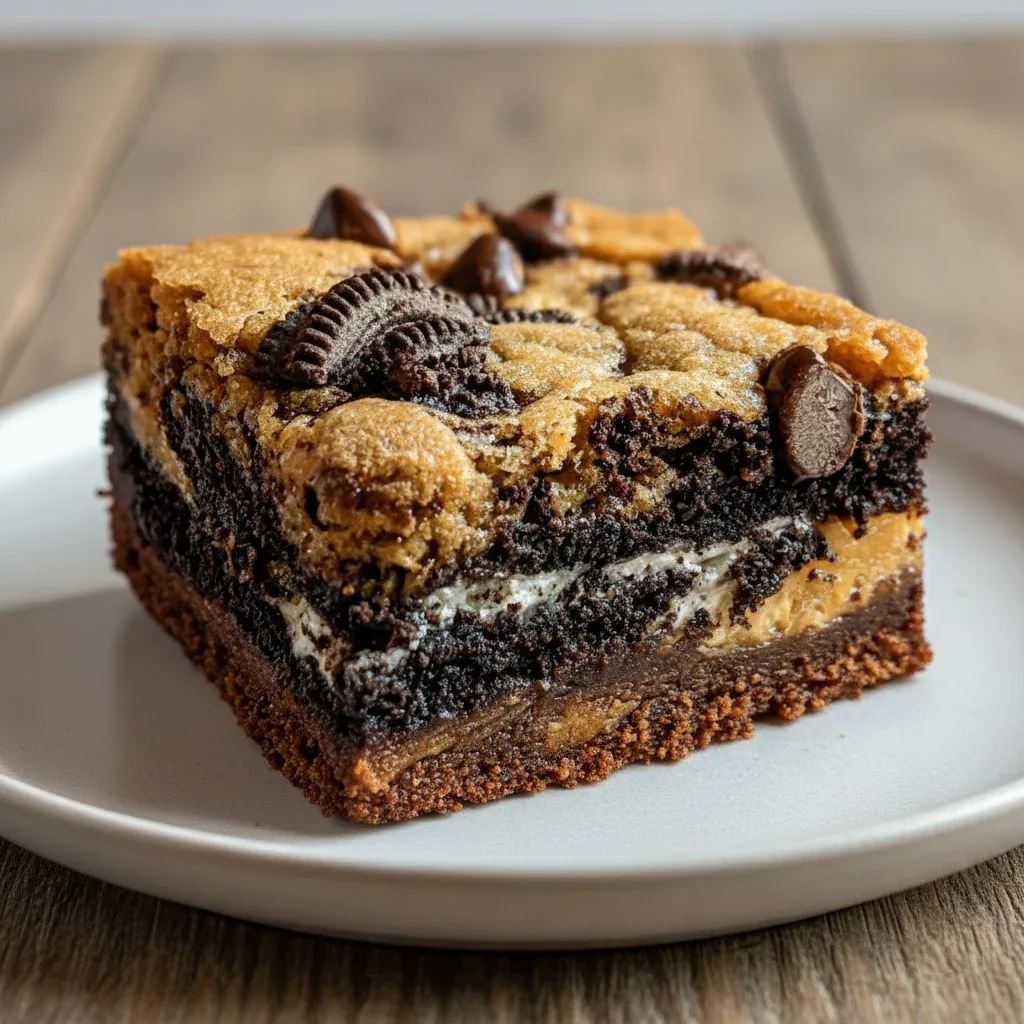
These dessert bars are truly the stuff of dreams. They begin with a generous layer of chocolate chip cookie dough, which is then covered with a perfect grid of Oreo biscuits. The whole thing is then enrobed in a velvety, fudgy brownie batter and baked into a sublime slab of perfection. It’s a triple-layered marvel of textures and flavours that will have your friends and family pleading for the recipe. Let’s get started and bake this masterpiece together.
Why You’ll Love This Recipe
- Three Desserts in One: In every mouthful, you get the perfect fusion of a cookie, an Oreo, and a brownie. The age-old dessert dilemma is officially solved!
- Guaranteed to Wow a Crowd: Arrive at any party, bake sale, or family get-together with a tray of these, and we promise you’ll be an instant hero. They look just as spectacular as they taste.
- Deceptively Simple to Make: Despite their show-stopping appearance, these bars are remarkably easy to put together. We’ve broken the process down into simple, clear steps that any home baker can master.
- A Symphony of Textures: From the soft, chewy cookie foundation to the crisp Oreo centre and the moist, fudgy brownie topping, each layer provides a wonderfully satisfying and distinct texture.
Ingredients
- unsalted butter
- light brown sugar
- granulated sugar
- large eggs
- vanilla extract
- plain flour
- bicarbonate of soda
- chocolate chips
- Oreo biscuits
- unsweetened cocoa powder
A Look at the Legendary Layers
The true genius of these brownies is found in their distinct yet perfectly complementary layers. Each element has a vital part to play in crafting the final, unforgettable taste sensation. Let’s explore what makes each layer so incredibly special.
Layer 1: The Chewy Chocolate Chip Cookie Base
Every great bake begins with a solid foundation. Our cookie dough base is wonderfully soft, chewy, and studded with chocolate chips. We use a blend of light brown and granulated sugars to give it that quintessential caramel-like depth and achieve the perfect chewy bite. As you press this into the tin, you’re laying the groundwork for pure dessert excellence.
Layer 2: The Creamy Oreo Middle
Next comes the delightful surprise concealed within. An entire layer of Oreo biscuits introduces a fantastic crunch and that iconic cookies-and-cream flavour. During baking, the Oreo filling softens just enough to create a creamy texture that contrasts beautifully with the crisp biscuit. It’s this simple, ingenious addition that takes the bake from great to absolutely legendary.
Layer 3: The Fudgy Brownie Topping
The crowning glory is a lavishly rich brownie batter poured over the top. This is no ordinary brownie; it’s an exceptionally dense and intensely chocolatey fudgy brownie recipe. It bakes into a beautifully soft and moist topping that perfectly balances the layers beneath. Using melted butter and high-quality cocoa powder ensures a deep, satisfying flavour that any chocolate enthusiast will fall in love with.
Step-by-Step Guide to Making Slutty Brownies
Are you ready to create some magic? Follow these straightforward steps, and a pan of irresistible brownies will be yours in no time. We suggest reading through the entire method before you start.
-
- Getting Started: Set Your Oven and Tin: First off, preheat your oven to 175°C (160°C Fan/Gas Mark 4). Thoroughly grease and line a 9×9 inch (23×23 cm) square baking tin with baking parchment, ensuring you leave some overhang on the sides. This clever trick will create handles, making it easy to lift the brownies out later.
- Create the Cookie Dough Base: In a large mixing bowl, use an electric mixer to cream the softened butter with the brown and granulated sugars until the mixture is light and fluffy. Add the egg and vanilla extract, then beat again until just incorporated. In a separate bowl, whisk the plain flour, bicarbonate of soda, and salt. Gently add the dry ingredients to the wet, mixing on a low speed until a dough just comes together. Finally, fold in the chocolate chips.
- Form the First Layer: Press the finished cookie dough evenly across the bottom of your prepared tin. You can use your fingertips or the back of a spoon to create a smooth, compact base.
–
- Introduce the Oreo Middle: Carefully arrange the Oreo biscuits in a single, even layer over the cookie dough. Make sure they are packed in tightly, side by side, to achieve that perfect Oreo brownie cookies effect.
- Whisk Up the Brownie Topping: In another large bowl, whisk the melted butter and granulated sugar together. Add the eggs and vanilla, and continue to whisk until the mixture is smooth. Sift in the cocoa powder, plain flour, and salt, then whisk until everything is just combined—be careful not to overwork the batter! If you wish, you can fold in extra chocolate chips at this stage.
- Combine the Layers: Gently pour the brownie batter over the Oreo layer. Use a spatula to spread it carefully, making sure it covers all the biscuits and extends to the edges of the tin.
- Bake to Gooey Perfection: Place the tin into your preheated oven and bake for 30–35 minutes. To check for doneness, insert a skewer or toothpick into the centre. It should emerge with a few moist crumbs clinging to it, but no wet batter. The top will look set and may have a few slight cracks.
- The Hardest Part: Be Patient! This is undoubtedly the most crucial—and challenging—step! You must allow the brownies to cool completely in the tin before you even think about slicing them. We advise leaving them for at least 4 hours at room temperature, though you can accelerate this by chilling them in the fridge for 2 hours. This step guarantees clean slices and allows the layers to set perfectly.
Top Tips for the Perfect Layered Dessert Bars
Looking to make your brownies absolutely perfect? We’ve compiled our very best advice to ensure you achieve flawless results every single time. These pointers will help you become a master of all kinds of layered dessert bars!
- A Gentle Touch is Best: When making both the cookie dough and the brownie batter, mix only until the ingredients are just incorporated. Overmixing can develop too much gluten in the flour, resulting in a tough, cake-like bake rather than the desired chewy and fudgy texture.
- Use Room Temperature Ingredients: For the cookie layer in particular, using softened butter and a room-temperature egg helps everything combine smoothly and evenly, leading to a much better dough consistency.
- The Parchment Paper Sling is a Must: Creating an overhang with your baking parchment is a game-changer. It allows you to lift the entire slab out of the tin with zero fuss, preventing any tragic sticking incidents.
- Cooling is Crucial for Clean Slices: We understand how tempting it is to cut into them while they’re still warm, but patience truly is a virtue here. A completely cooled slab is essential for achieving those beautiful, well-defined layers. For exceptionally neat cuts, use a large, sharp knife and remember to wipe it clean after each slice.
Variations and Customisations
While we believe the classic recipe is a masterpiece in its own right, we always encourage a bit of creative flair in the kitchen. Here are some wonderful ideas to add your personal touch to this fantastic treat:
Swap the Biscuits
The Oreo is iconic, but there’s a world of possibilities out there! You could try using other filled biscuits such as Biscoff, Custard Creams, or even experiment with mint-flavoured Oreos for a festive variation. For more Biscoff-themed deliciousness, you should take a look at our Biscoff Rice Krispie Treats!
Add Extra Mix-ins
Feel free to enhance the batters with some extra goodies. A handful of chopped pecans or walnuts folded into the brownie layer would add a delightful crunch. For an even more decadent experience, a drizzle of salted caramel sauce between the Oreo and brownie layers would be heavenly. Alternatively, a sprinkle of flaky sea salt on top right after baking will beautifully intensify the chocolate flavour.
FAQ
Conclusion: Your New Favourite Decadent Dessert
And there you have it—your complete guide to creating the most sensational bake you’ll ever serve. These Slutty Brownies are so much more than a simple dessert; they are an experience. Each bite is a glorious celebration of chocolate, cream, and pure, unadulterated happiness. It’s the ideal recipe for when you need a truly decadent dessert to impress your guests, comfort your loved ones, or simply to indulge yourself.
We are thrilled for you to try this recipe and discover the magic for yourself. If you’re a fan of layered bars, why not have a go at our Lemon Cheesecake Crumb Bars next? Please don’t forget to leave a comment below to tell us how you got on, and be sure to tag us in a photo on social media. Happy baking!
Recipe Card

Ingredients
For the Chocolate Chip Cookie Layer:
-
- 115g (1/2 cup) unsalted butter, softened
- 100g (1/2 cup) light brown sugar
- 50g (1/4 cup) granulated sugar
- 1 large egg
- 1 tsp vanilla extract
- 125g (1 cup) plain flour
- 1/2 tsp bicarbonate of soda
- 1/4 tsp salt
- 150g (1 cup) chocolate chips
For the Middle Layer:
-
- 16-20 Oreo biscuits
For the Fudgy Brownie Layer:
- 115g (1/2 cup) unsalted butter, melted
- 200g (1 cup) granulated sugar
- 2 large eggs
- 1 tsp vanilla extract
- 65g (1/2 cup) plain flour
- 40g (1/3 cup) unsweetened cocoa powder
- 1/4 tsp salt
Instructions
- Prep: Preheat your oven to 175°C (160°C Fan). Grease and line a 9×9 inch (23×23 cm) square baking tin with parchment paper, leaving an overhang on the sides to act as a sling.
- Make the Cookie Dough Layer: In a large bowl, cream the softened butter with the light brown and granulated sugars until light and fluffy. Beat in 1 egg and vanilla extract. In a separate bowl, whisk together the flour, bicarbonate of soda, and salt. Gently mix the dry ingredients into the wet until just combined, then fold in the chocolate chips.
- Form the Base: Press the cookie dough evenly into the bottom of your prepared tin.
- Add the Oreo Layer: Arrange the Oreo biscuits in a single, even layer over the cookie dough, packing them in tightly.
- Make the Brownie Topping: In another large bowl, whisk together the melted butter and granulated sugar. Add the 2 eggs and vanilla, and whisk until the mixture is smooth. Sift in the flour, cocoa powder, and salt, then whisk until just combined—be careful not to overmix.
- Combine and Bake: Gently pour the brownie batter over the Oreo layer and use a spatula to spread it evenly to the edges. Bake for 30–35 minutes, or until a skewer inserted into the centre comes out with moist crumbs attached.
- Cool Completely: This is the most important step! Allow the brownies to cool completely in the tin before lifting them out and slicing. For best results, chill for at least 2 hours in the fridge to ensure clean cuts.