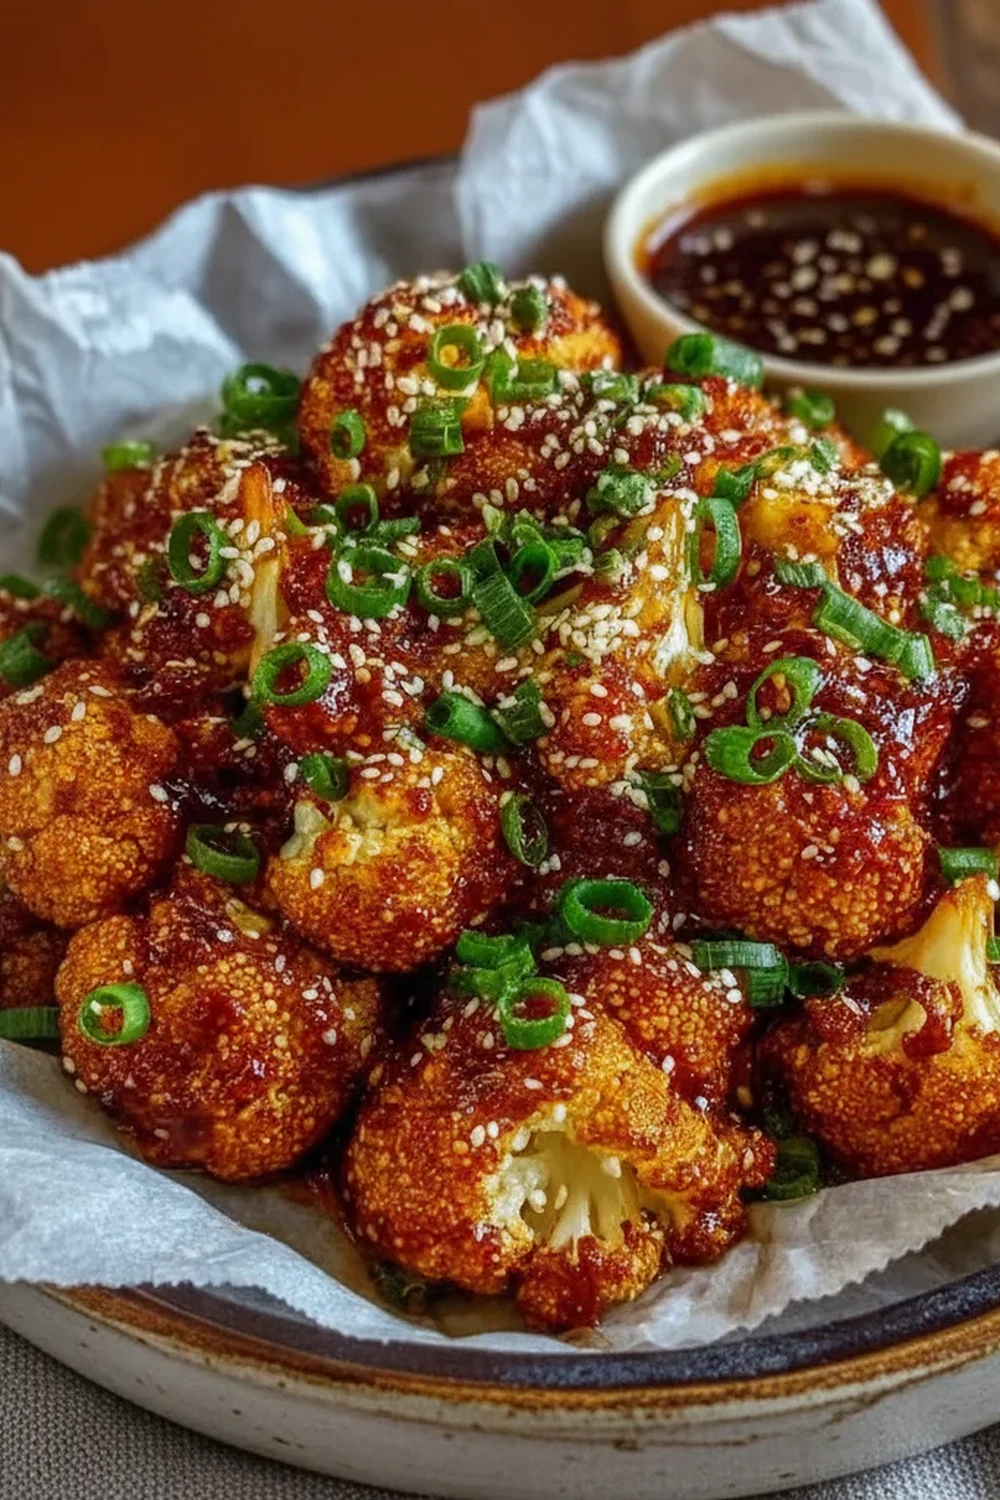
Spicy Korean Baked Cauliflower
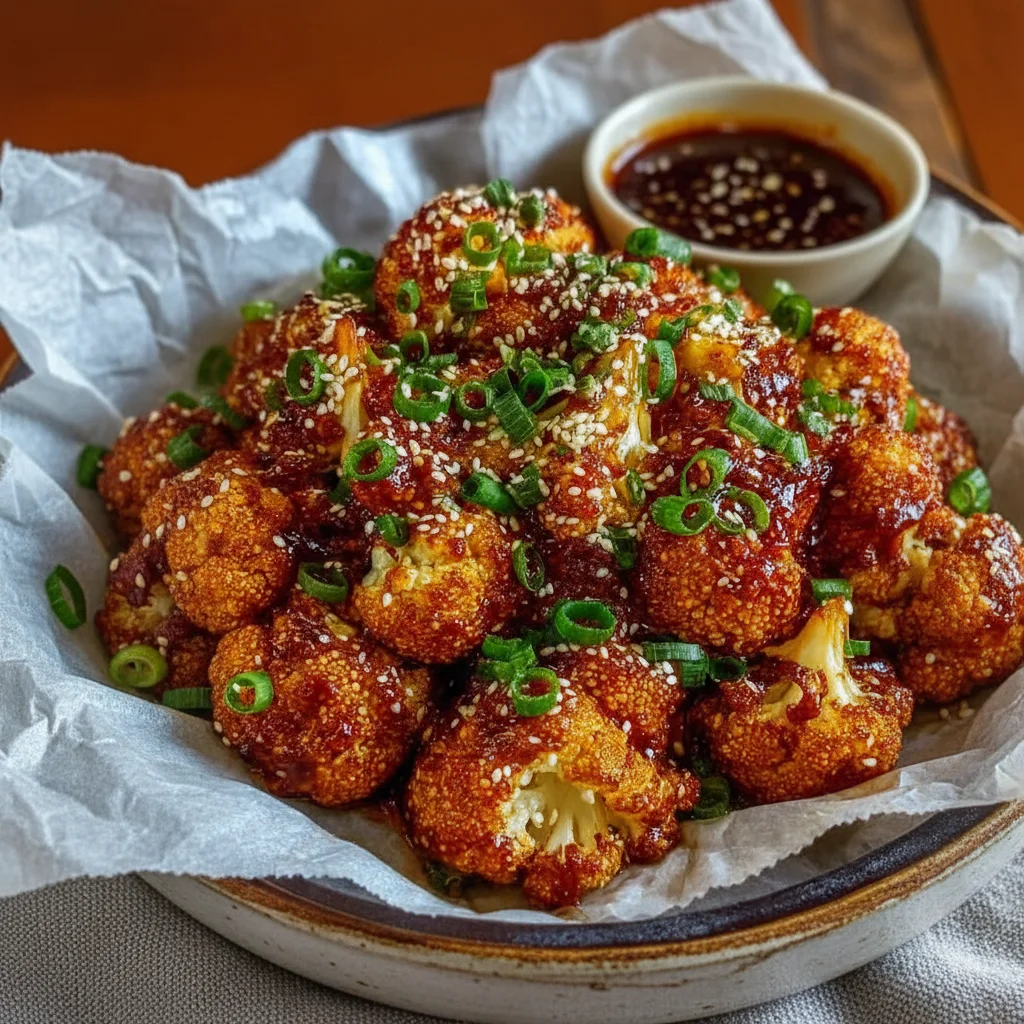
There’s something truly magical about transforming a humble cauliflower into a dish that commands the centre of the table. Forget boiled or steamed; we’re talking about florets baked to a perfect crisp-tender bite, then generously coated in a sticky, savoury, and gently spicy Korean-inspired glaze. The sauce clings to every nook and cranny, caramelising in the oven’s heat to create a flavour that is deeply satisfying. After testing this recipe five times, I finally got it just right, balancing the bake time and the sauce consistency to ensure the cauliflower is never soggy, only spectacular.
This Korean Baked Cauliflower has become a firm favourite in my house. It’s the kind of dish that works beautifully for a vibrant weeknight dinner when you want something special without a lot of fuss. It’s also a brilliant side dish that often outshines the main event. We’re using a two-step baking process here, which is the key to getting that wonderful texture – a crisp coating that holds up to the delicious, glossy sauce. It’s a fantastic way to enjoy vegetables, and even those who aren’t the biggest cauliflower fans seem to come back for a second helping.
Recipe Overview
This recipe achieves that sought-after sticky and crisp texture without any deep-frying. We first bake the lightly battered cauliflower florets until they are golden and cooked through, then toss them in a flavour-packed gochujang sauce and return them to the oven for a final bake. This second step allows the sauce to thicken and caramelise beautifully onto each piece. I found that letting the sauce simmer for just a minute or two before coating the cauliflower makes a huge difference to the final glaze.
- Prep Time: 15 minutes
- Cook Time: 30 minutes
- Total Time: 45 minutes
- Servings: 4 people (as a side)
- Difficulty: Easy
Why You’ll Love This Korean Baked Cauliflower
- Genuine Flavour: The sauce is the star, with the deep, savoury spice from gochujang, a salty tang from soy sauce, nuttiness from sesame oil, and a sharp freshness from ginger and garlic. It’s a complex flavour that is wonderfully balanced.
- Ready in Under an Hour: From start to finish, this dish comes together in about 45 minutes, making it completely manageable for a weeknight meal.
- Flexible Recipe: You are in complete control of the heat. Add a little extra gochujang or a pinch of gochugaru (Korean chilli flakes) for more fire, or dial it back for a milder taste. You can also swap honey for maple syrup to make it vegan.
- Great for Sharing: This works wonderfully as part of a larger spread for a casual get-together with friends, served alongside rice and some simple steamed greens.
- Family Tested: My family, who can be quite particular about vegetables, absolutely love this dish. The sticky, sweet, and savoury coating wins everyone over every single time.
Ingredients You’ll Need
For the sauce, the key ingredient is gochujang, a fermented Korean chilli paste. You can find it in most large supermarkets now, often in the world foods aisle. I often use the O’Food brand as I find its flavour is consistently rich and well-rounded.
- 1 large head of cauliflower (about 800g), cut into bite-sized florets
- For the Batter:
- 60g plain flour
- 60g cornflour
- 1/2 tsp fine sea salt
- 1/4 tsp black pepper
- 150ml ice-cold water
- For the Korean Sauce:
- 3 tbsp gochujang (Korean chilli paste)
- 3 tbsp reduced-sodium soy sauce
- 2 tbsp honey or maple syrup
- 1 tbsp rice vinegar
- 1 tbsp toasted sesame oil
- 2 cloves garlic, finely minced
- 1 tbsp fresh ginger, grated
- For Garnish:
- 1 tbsp toasted sesame seeds
- 2 spring onions, finely sliced
Sophia’s Tip: Using ice-cold water for the batter helps create a lighter, crispier coating on the cauliflower. I just pop a few ice cubes into my measuring jug of water for a few minutes before mixing.
How to Make Korean Baked Cauliflower
The process is straightforward. We create a light batter for the cauliflower, bake it until crisp, and then coat it in the glossy, flavourful sauce for a final, quick bake to let it all meld together.
- Preheat your oven to 200°C (180°C fan) and line a large baking tray with parchment paper.
- In a large bowl, whisk together the plain flour, cornflour, salt, and pepper. Gradually pour in the ice-cold water, whisking continuously until you have a smooth, thin batter, similar in consistency to single cream.
- Add the cauliflower florets to the batter and toss gently with your hands or a spatula until every piece is lightly and evenly coated. Don’t worry if the coating looks thin; it’s just what we need.
- Arrange the battered florets on the prepared baking tray in a single layer, ensuring there is space between them. This is crucial for getting them crispy. You may need two trays.
- Bake for 20-25 minutes, flipping them halfway through, until the coating is dry, crisp, and lightly golden.
- While the cauliflower is baking, prepare the sauce. In a small saucepan, combine the gochujang, soy sauce, honey (or maple syrup), rice vinegar, sesame oil, minced garlic, and grated ginger.
- Heat the sauce over a medium-low heat, stirring constantly, for 2-3 minutes until it’s warmed through and slightly thickened. Don’t let it boil. Remove from the heat and set aside. What works best for me is to have the sauce ready just as the cauliflower comes out of the oven for its first bake.
- Once the cauliflower is golden, remove it from the oven. Transfer the hot florets to a large bowl, pour over the prepared sauce, and toss gently until every piece is well-coated in the glossy glaze.
- Return the sauced cauliflower to the parchment-lined baking tray, spreading it out again. Bake for a final 5-8 minutes, just until the sauce is bubbling and has caramelised onto the florets. Keep a close eye on it, as the sugars in the sauce can burn quickly.
- Remove from the oven, transfer to a serving dish, and garnish generously with toasted sesame seeds and sliced spring onions. Serve immediately.
Tips From My Kitchen
- Temperature Control: A hot oven is essential. If your oven runs cool, the cauliflower can steam instead of bake, resulting in a softer texture. Use an oven thermometer if you’re unsure. 200°C (180°C fan) is the sweet spot.
- The Secret Step: The double-bake method is non-negotiable. The first bake cooks and crisps the cauliflower, while the second brief bake after saucing makes the glaze sticky and caramelised. I learned that saucing it from the start just leads to a mushy result.
- Make-Ahead: You can prepare the sauce up to 3 days in advance and store it in an airtight container in the fridge. You can also wash and chop the cauliflower a day ahead. However, for the best texture, I recommend battering and baking it just before serving.
- Storage: Leftover Korean baked cauliflower can be stored in the fridge for up to 2 days. It will lose its crispness, but the flavour is still fantastic. Reheat in the oven at 180°C for about 10 minutes to help it crisp up again slightly.
Common Mistakes to Avoid
- Overcrowding the pan: Giving each floret its own space on the baking tray is the most important step for achieving a crispy texture. If they’re packed too tightly, they will steam instead of roast. Use two trays if necessary – it’s worth the extra washing up. For a deeper dive, Serious Eats has a great guide on the science of roasting vegetables.
- Saucing Too Early: Don’t be tempted to add the sauce before the first bake is complete. The moisture will prevent the batter from crisping up properly. Wait until the florets are golden and dry to the touch before tossing them in the glaze.
- Burning the Glaze: The final 5-8 minute bake is just to set the sauce. Because of the honey or maple syrup, it can go from perfectly caramelised to burnt very quickly. Keep a very close eye on it during this last step.
Delicious Variations to Try
Once you have the basic method down, it’s fun to experiment with the flavours. Here are a few ideas to get you started:
- Spicier Version: For those who like more heat, add 1-2 teaspoons of gochugaru (Korean red pepper flakes) to the sauce mixture for an extra layer of spice.
- Vegan Option: This recipe is easily made vegan by simply swapping the honey for an equal amount of maple syrup or agave nectar in the sauce. The result is just as delicious.
- Different Protein: This sauce and baking method work brilliantly with other ingredients. Try it with firm tofu cubes (press them well first!) or even chicken pieces. If you like this flavour profile, you might also enjoy my Bang Bang Chicken Thighs recipe.
What to Serve With Korean Baked Cauliflower
This dish is versatile enough to be a star side or a satisfying main. Here are a few of my favourite pairings:
- Steamed Jasmine Rice: Simple, fluffy rice is the perfect neutral canvas to soak up any extra sauce and balance the bold flavours of the cauliflower.
- Quick Cucumber Salad: A refreshing salad of thinly sliced cucumber, a splash of rice vinegar, and a pinch of salt provides a cool, crisp contrast to the warm, sticky cauliflower.
- A Cold Drink: A crisp, cold lager or a dry Riesling cuts through the richness of the sauce beautifully. For a non-alcoholic option, iced green tea works wonderfully.
Frequently Asked Questions
Korean Baked Cauliflower
Ingredients
Method
- Preheat your oven to 200°C (180°C fan) and line a large baking tray with parchment paper.
- In a large bowl, whisk together the plain flour, cornflour, salt, and pepper. Gradually pour in the ice-cold water, whisking continuously until you have a smooth, thin batter, similar in consistency to single cream.
- Add the cauliflower florets to the batter and toss gently with your hands or a spatula until every piece is lightly and evenly coated. Don't worry if the coating looks thin; it's just what we need.
- Arrange the battered florets on the prepared baking tray in a single layer, ensuring there is space between them. This is crucial for getting them crispy. You may need two trays.
- Bake for 20-25 minutes, flipping them halfway through, until the coating is dry, crisp, and lightly golden.
- While the cauliflower is baking, prepare the sauce. In a small saucepan, combine the gochujang, soy sauce, honey (or maple syrup), rice vinegar, sesame oil, minced garlic, and grated ginger.
- Heat the sauce over a medium-low heat, stirring constantly, for 2-3 minutes until it's warmed through and slightly thickened. Don't let it boil. Remove from the heat and set aside. What works best for me is to have the sauce ready just as the cauliflower comes out of the oven for its first bake.
- Once the cauliflower is golden, remove it from the oven. Transfer the hot florets to a large bowl, pour over the prepared sauce, and toss gently until every piece is well-coated in the glossy glaze.
- Return the sauced cauliflower to the parchment-lined baking tray, spreading it out again. Bake for a final 5-8 minutes, just until the sauce is bubbling and has caramelised onto the florets. Keep a close eye on it, as the sugars in the sauce can burn quickly.
- Remove from the oven, transfer to a serving dish, and garnish generously with toasted sesame seeds and sliced spring onions. Serve immediately.
Notes
I really hope you give this Korean Baked Cauliflower a go. It’s such a satisfying and flavourful way to cook a vegetable that sometimes gets overlooked. It always gets compliments in my home, and I’d love to hear how it turns out in yours. Please feel free to leave a comment below with your experience or any questions you might have. Happy cooking! – Sophia
P.S. If you’re looking for another savoury dinner idea, these Bacon Brown Sugar Chicken Tenders are always a hit, and for dessert, this Peach Crumb Cheesecake is a real treat.